Chronic and/or temporary injuries are the number one reason why clients can’t fully participate in exercise programs or fall short of achieving their fitness goals. While many health and fitness professionals are aware of this growing problem, more than 40 percent of personal trainers do not have a structured approach for helping clients alleviate recurring muscle and joint pain (IDEA, 2013). This enormous gap between the pain-relief needs of clients and the lack of corrective exercise services offered to them is the driving force behind this three-part article series.
This first article in the series teaches you how to develop and implement a successful self-myofascial release (SMR) program to alleviate muscle and joint pain. The second and third articles will focus on how to progress corrective exercise programs by incorporating stretching techniques and corrective strengthening exercises to retrain client movement patterns. Learning about these vital elements of corrective exercise program design ensures that personal trainers feel confident in applying their skills and that clients benefit from safe, effective and pain-free workouts.
Prioritizing Self-myofascial Release in Client Programs
When designing a corrective exercise program, you should incorporate activities that accomplish the following goals in the order listed below:
- Introduce SMR techniques to regenerate/release the muscles and fascia.
- Incorporate stretching exercises to realign structures, increase blood flow and improve range of movement.
- Integrate strengthening exercises to retrain muscles and challenge the nervous system.
It is important to reiterate that reconditioning any soft-tissue structures that have been damaged and stressed from past injuries and/or dysfunction should always precede any attempt to introduce stretching or strengthening exercises/movements (ACE, 2014).
Types of Self-myofascial Release Techniques
SMR involves applying repetitive pressure to an area of soft tissue (i.e., muscles and fascia) that contains restrictions or lacks movement. The sustained pressure stimulates circulation to the area, reduces pressure build-up from sluggish blood flow and restores suppleness to the tissues (Rolf, 1989).
Trigger-point massage is a form of SMR that is used to restore movement and elasticity to muscles and their associated fascia. Trigger-point massage is slightly different, however, in that it is intended to target a very specific area of a muscle (or the surrounding fascia). Trigger points are tender spots located within a taut band of myofascial tissue. They are called trigger points because they trigger a painful response to the surrounding area when stretched, moved or touched. Like all myofascial issues, trigger points will not go away on their own. If left unaddressed, trigger points can lead to additional restrictions and compensation patterns throughout the entire body (Abelson and Abelson, 2003).
The Benefits of Self-myofascial Release
The use of myofascial release techniques is not exactly a new idea. Massage has been used in one form or another to promote health, relieve stress and reduce pain for approximately 5,000 years.
There are many documented benefits of myofascial release and self-massage, including (Price, 2013):
- Increased circulation that enables oxygen and other nutrients to reach vital muscles and other soft tissues to facilitate faster recovery from exercise
- Increased joint flexibility that prepares joints for the increased range of movement and increased load that accompanies stretching, strengthening and other dynamic exercises
- Reduced adhesions and scar tissue that improves the elasticity of muscles and other soft tissues to improve movement and reduce pain
- Elimination of stored tension in muscles to assist in alleviating aches and pains
- Regulation of the production of compounds called cytokines, which play a role in decreasing inflammation
- Increased activity in the mitochondria of cells helping promote repair and growth of muscle tissue
- The release of endorphins to help reduce pain
How to Develop a Self-myofascial Release Program
What myofascial structures need to be addressed?
Performing a comprehensive postural/structural assessment at the outset of a client’s corrective exercise program will enable you to identify which bony structures are out of alignment, and subsequently, which myofascial structures originate/insert on those bones. Once these muscles/soft tissues have been identified, you can determine what SMR strategies should be introduced to the client’s program to regenerate and rejuvenate these affected tissues (Price, 2010). While it is beyond the scope of this article to describe individual postural/structural assessments, the following articles contain such assessments:
Which specific SMR techniques should I recommend?
Once you have identified which myofascial structures need addressing, consider the following questions before recommending specific techniques (Price, 2010):
- Structure – What structures (muscles and fascia) are you addressing with this exercise?
- Imbalance – What postural/musculoskeletal imbalance(s) are you trying to correct with this exercise?
- Mechanics – What are the correct mechanics of the exercise needed to ensure the imbalance/dysfunction is addressed instead of exacerbated?
- Practical – Can the client perform this exercise regularly (i.e., is the technique understandable and are the equipment needs reasonable)?
- Level – Can this exercise be altered for a greater or lesser challenge to meet the needs of your client? (More information on progressing and regressing SMR techniques is presented later in this article.)
- Exercise Alternatives – Is there a similar exercise that targets the same imbalance that is more likely to increase client adherence (i.e., an exercise the client likes better or that can be more easily incorporated into his or her daily routine)? For example, SMR techniques that require a tennis ball would be more practical for frequent travelers than foam-roller exercises.
How should I teach SMR techniques?
SMR exercises provide you and your client the opportunity to develop the trainer-client relationship and build trust regarding your program recommendations. Therefore, it is crucial to select SMR exercises that will quickly reduce painful symptoms and teach your clients in a manner that will promote their success (Rejeski, 1992).
Here are some key points to remember when introducing clients to SMR techniques:
- A person’s initial reaction to getting on a tennis ball or roller to perform a SMR exercise will often be to tense up in response to the discomfort and/or pressure they feel. Therefore, give your client time to adjust to these new sensations so they can begin to relax and allow pain relieving hormones to be released into the body.
- Make sure the SMR techniques you suggest are practical for clients to perform. Do not recommend pieces of equipment that clients do not have, are difficult or expensive to purchase, or impractical to have on hand.
- Explain to clients why they are performing a particular SMR exercise and how it relates to their specific imbalance(s). Understanding the rationale behind your exercise recommendations gives clients a good reason to perform the exercises regularly.
- Make sure that the SMR techniques you recommend are not too painful. For example, for some people, rolling the iliotibial band can be extremely uncomfortable and will only serve to decrease adherence to performing this exercise regularly.
Self-myofascial Release Techniques: Progressions, Regressions and Precautions
Safe and successful performance of SMR techniques is paramount, whether clients are under your supervision or executing the techniques alone at home as part of their corrective exercise homework. Because clients are dedicating valuable time and effort to this component of their program, it is also important that they experience pain-relieving benefits as quickly as possible. Therefore, you must know when to regress, progress and take precaution when designing SMR programs (Price, 2010).
Regressions
- Regress SMR techniques any time a client feels uncomfortable in any way. For example, if a client performing a foam roller exercise keeps falling off balance, remove the problem by regressing him or her to an easier version of the exercise, such as lying on the floor using a tennis ball.
- Always regress a SMR exercise if a client experiences any type of pain. Because SMR techniques are intended to rejuvenate unhealthy soft-tissue structures, it is natural for clients to experience discomfort or soreness when they first begin doing them. However, if the painfulness does not slowly diminish as the client performs the exercise, it should be stopped and regressed (e.g., regress a foam roller exercise by using a softer foam roller).
- If a client does not understand what he or she is supposed to do to perform a SMR exercise correctly, regress the technique according.
- Regress a SMR technique if performing the exercise causes pain or discomfort to another part of the body. For example, many foam-roller exercises require the client to balance on one arm while rolling the legs or hips. Propping up one’s body weight on an arm may place undue stress on a client’s shoulder(s) and/or cause pain. If this is the case, instruct the client to stop performing the exercise and regress to another exercise (e.g., using a tennis ball lying on the ground) that does not stress the shoulder.
Progressions
- Progress a SMR technique if a client no longer feels any tenderness when applying pressure to the target area (e.g., use a firmer roller or harder ball).
- Progress a SMR technique to a stretching (or possibly a strengthening) exercise (these will be discussed in detail in the next two articles in this series) if the target tissues have released enough to perform the desired range of motion with correct technique. However, if you progress to a stretch or strengthening exercise and find that your client cannot perform the movement well, go back and spend more time releasing the area with SMR.
- SMR exercises should always remain a staple of your client’s program. Rejuvenating and regenerating the myofascial structures on a regular basis ensures that soft tissues remain healthy and pain-free, and recover quickly from strenuous workouts.
Precautions
- Observe your clients’ body language for any signs of pain or problems as they perform SMR exercises. If they are uncomfortable for any reason, alter the exercise to ensure they can relax and will not do themselves harm.
- As clients experience relief from pain provided by the massage pressure of SMR, many will want to increase the amount of pressure they apply to areas of the body. While this can be a good way to progress a program, you should also teach your clients to be wary of applying too much pressure or staying on a sore spot for long periods of time. Too much pressure or sustained pressure may inadvertently damage the muscle and/or fascia.
Sample Self-myofascial Release Program
A common postural deviation that causes both muscle and joint pain is excessive thoracic kyphosis (i.e., an over-rounding of the upper back). (For more information on this postural deviation, refer to the Thoracic Spine Assessment outlined here: Using Postural Assessments to Eliminate Pain). Addressing the major muscle groups that originate and insert on the thoracic spine and contribute to this common deviation with appropriate SMR techniques can facilitate better function of these tissues, correct the imbalance and alleviate associated pain in the upper back, neck and shoulders.
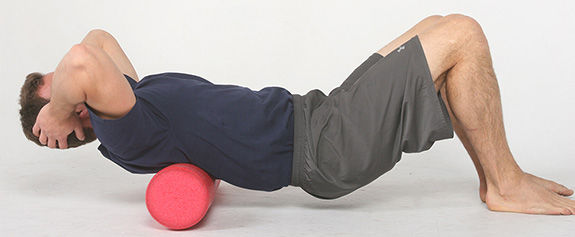
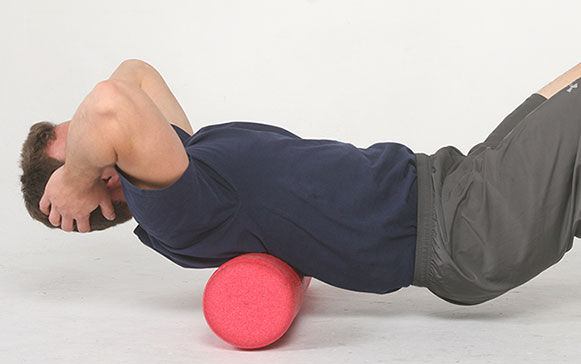
Foam Roller on Upper Back
The erector spinae muscles are responsible for keeping the spine upright and erect (Gray, 1995). When the upper back and shoulders round forward, as is the case with excessive thoracic kyphosis, these muscles can get strained and stressed. Regenerating and rejuvenate these tissues decreases pain and prepares these muscles to progress to appropriate stretching and strengthening exercises.
Place a foam roller perpendicular to the spine and lie over it. Support the head with the hands and gently tuck the hips under to posteriorly rotate the pelvis. Gently roll up and down the upper back, keeping the pelvis tucked under to ensure the lower back does not arch. Do not roll the lower back. Perform daily for one to two minutes.
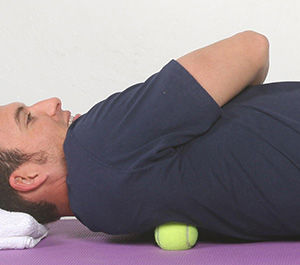
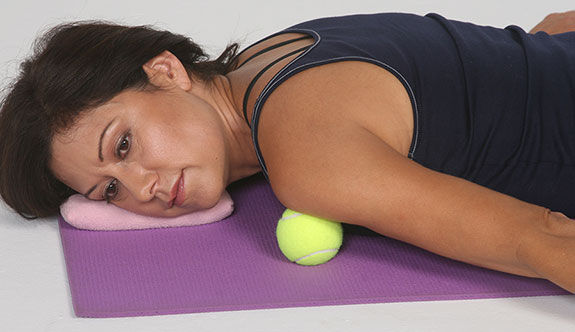
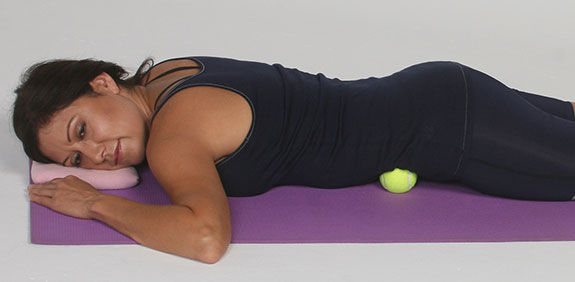
Tennis Ball around Shoulder Blade
When the upper back rounds forward, the shoulder blades protract away from the spine, which can cause the rhomboids and middle fibers of the trapezius muscles to become strained (Kendall, et al., 2005). Rejuvenating and regenerate these tissues helps decrease pain and prepares these muscles for subsequent strengthening exercises that retract and depress the scapula.
Lie on the floor with the knees bent and bring the right arm across the chest to hug the left shoulder/arm. Place a tennis ball under the right side of the upper back between the spine and the right shoulder blade. Find a sore spot and maintain pressure on it until it releases (five to 10 seconds). Then move the ball to another spot by scooting the body slightly. When all the sore spots on the right side have been released, move the ball over to the left side and repeat the process. Do each side for about one to two minutes daily.
Tennis Ball on Front of Shoulder and Chest
Excessive thoracic kyphosis affects the position of the glenohumeral joint by rotating it forward (Kendall, et. al., 2005). This non-optimal position of the arm affects the muscles of the anterior shoulder and chest. Massaging these muscles helps decrease pain and prepare them for corrective stretching exercises.
Lie face down and extend the arm out straight from the body (below shoulder height) with the palm facing down. Use the other hand to place a tennis ball underneath the front of the shoulder and upper chest. Find a sore spot and maintain pressure on it until it releases (five to 10 seconds). Then move to the next spot. Repeat daily on both sides for about one to two minutes.
Massage Ball on Abdominals
Excessive thoracic kyphosis can cause the abdominal muscles (which are responsible for rounding the spine forward) to become restricted and tight (Golding and Golding, 2003). Performing SMR on the abdominals helps release any restrictions so the thoracic spine can extend more effectively.
Lie face down and place a tennis ball between the stomach and the floor just below the bottom of the rib cage to the right of the bellybutton. Find a sore spot and maintain pressure on it until it releases (five to 10 seconds). Then move to the next spot by scooting the body up so that the ball moves down. Do this all along the abdomen, past the bellybutton to in line with the top of the hips. Then repeat the process on left side of the bellybutton. Do each side for about two to three minutes daily.
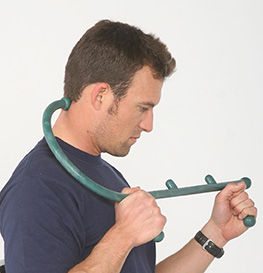
Theracane on Neck
Excessive rounding of the upper back typically causes a person to overarch the neck to bring the eyes in line with the horizon (ACE, 2014). Over time, this can lead to pain in the upper back and neck. Massaging the muscles of the neck helps decrease pain in this area and also enables the head to come back on top of the torso, allowing the thoracic spine to be more upright.
Apply steady pressure with a Theracane to any sore spots on the back of the neck, from the top of the shoulders to the base of the skull. Perform for three to five minutes daily.
Conclusion
Strategic SMR techniques should be the mainstay of any client program. The techniques outlined in this article can rejuvenate and regenerate those myofascial structures that need addressing before progressing clients to the stretching and strengthening components of their corrective exercise programs.
Become a BioMechanics Method® Corrective Exercise Specialist

Want to learn more about how you can help your clients exercise with less pain? The BioMechanics Method® Corrective Exercise Specialist online course (TBMM-CES) is specifically designed to give fitness professionals a step-by-step process for helping clients overcome muscle and joint pain. Created by Justin Price, one of the top musculoskeletal assessment and corrective exercise experts in the world, this course will give you the postural assessment, anatomy, corrective exercise and program design skills necessary to help clients become pain free. This self-paced study course is valued at 8.0 ACE CECs and includes digital textbooks, videos and online quizzes.
References
Abelson, B. and Abelson, K. (2003). Release Your Pain. Calgary: Rowan Tree Books.
American Council on Exercise (2014). ACE Personal Trainer Manual (5th ed.). San Diego, Calif.: American Council on Exercise.
Golding, L.A. and Golding, S.M. (2003). Fitness Professionals’ Guide to Musculoskeletal Anatomy and Human Movement. Monterey, Calif.: Healthy Learning.
Gray, H. (1995). Gray’s Anatomy. New York: Barnes & Noble Books.
IDEA Health & Fitness Association (2013). IDEA Fitness Programs and Equipment Trends Report.
Kendall, F.P. et al. (2005). Muscles: Testing and Function with Posture and Pain (5th ed.). Baltimore, Md.: Lippincott Williams & Wilkins.
Price, J. (2010). The BioMechanics Method Corrective Exercise Educational Program. The BioMechanics Press.
Price, J. (2013). The Amazing Tennis Ball Back Pain Cure. The BioMechanics Press.
Rejeski, W.J. (1992). Motivation for exercise behavior: A critique of theoretical directions. In G.C. Roberts (Ed.) Motivation in Sport and Exercise. Champaign, Ill.: Human Kinetics.
Rolf, I.P. (1989). Rolfing: Reestablishing the Natural Alignment and Structural Integration of the Human Body for Vitality and Well-Being (revised edition). Rochester, Vt.: Healing Arts Press.


 by
by