Lower-back pain is a fact of life for a significant number of adults, which means it is likely your clients will turn to you for help in relieving their pain so they can return to the activities they enjoy. In part one of this two-part series, we covered a series of musculoskeletal assessments and corrective exercises you can use to identify and target imbalances in the lower body (i.e., feet, ankles and hips). This second article explores upper-body causes of lower-back pain. You will learn how the upper body should move when it is functioning correctly, how postural and movement imbalances in the upper body can lead to lower-back pain, and several simple and effective corrective exercise strategies you can integrate into your personal-training programs.
Reviewing the Lower Body
Understanding how the structures of the lower body work during common activities, such as walking, running and lunging, is vital to comprehending how upper-body issues can contribute to back pain. As such, here is a brief recap of what should happen when the lower body is functioning correctly. As you transfer weight forward and from side to side as you step forward, the feet should roll inward and toward each other (i.e., pronate). When the feet pronate, the ankles should also roll in, which helps rotate the lower leg, knee and thigh toward the midline of the body. The femur (i.e., thigh bone), which fits into the pelvis to form the hip socket, should also rotate inward in time with the lower leg, foot and ankle (Kendall et al., 2005). When all of these body parts are working together correctly, the lower back experiences less stress because the forces of gravity and impact (i.e., ground reaction forces) are dissipated evenly throughout the structures of the lower body.
A Quick Look at How the Upper Body Should Work
When you transfer your weight forward during activities like walking and running, your body must also resist the downward pull of gravity so it doesn't topple over forward. It achieves this goal by constantly adjusting the position of your bones and joints and using muscles to ensure you remain balanced. When you take a step forward, for example, the opposite leg stays back. Similarly, as you swing one arm forward the other one swings behind you. As your torso tips forward your hips bend backward. All these opposing movements are designed to help maintain your center of gravity, keep your body upright, and prevent the structures of your lower back and body from getting overworked.
How Upper-back and Shoulder Dysfunction Can Lead to Lower Back Pain
Now let’s take a look at how dysfunction in the upper body can lead to back pain. Most of us spend a lot of the day sitting while hunched over computers, driving, watching television, eating and looking down at handheld computer devices. Over time, these activities cause the upper back to round forward too much (i.e., excessive thoracic kyphosis) and the shoulder blades to move forward on the rib cage (i.e., protract) (Price and Bratcher, 2010). As the upper back rounds forward, the head also moves forward of its optimal position.
The human head weighs 8 to 11 pounds. For every inch the head is forward of optimal position, it doubles its effective weight to the body. Therefore, if a woman’s head is 1 inch forward of its optimal position, and her head weighs 10 pounds, the effective weight of her head to her body is 20 pounds. A 20-pound weight hanging forward of the body, coupled with the fact that the upper back is also rounding forward, means that all of the structures of the lower back must compensate to prevent her body from falling forward and off balance when she is standing and walking or moving forward. Because the lower back has a natural backward arch (i.e., a lordotic curve), it arches further backward to hold up the upper back and head. This compensation and overworking of the lower back is called excessive lumbar lordosis. It can lead to muscle fatigue, disc degeneration of the lumbar spine and a whole host of musculoskeletal problems (American Council on Exercise, 2010).
Moreover, when the upper back is rounded forward as described above, the rib cage drops down at the front, the shoulder blades protract and the arms swing across and in front of the body (Rolf, 1989). These changes in position to the torso, shoulders and arms create immobility in the upper body. Specifically, they inhibit the ability of the thoracic spine to rotate and the arms to swing freely when walking or running. This immobility in the upper back and shoulders means the upper body cannot adequately assist in balancing the body and transferring gravity and impact forces through the lower body and back. Unfortunately, the structures of the lower back experience more stress as a result.
Assessments for the Upper Body

Assessing your client’s head, neck, upper back, shoulders and arms can help you evaluate the position and condition of these structures to determine if they are working correctly. Here are two assessments for these important areas.
Position of Head
This assessment evaluates the position of your client’s head and helps you determine whether it is forward of its optimal position.
Figure 1. Example of Forward Head Position
How to Perform:
Ask the client to sit on a stability ball or the edge of a chair with the feet and head facing forward. Look at the client’s cheekbone, just below his or her eye where it protrudes the most. Place one forefinger on that part of the client’s cheek and the other on his or her collarbone below that same cheek. Determine the position of your forefingers in relation to each other. Ideally, your forefingers should be vertically aligned. If the top forefinger is forward of the bottom forefinger, this is indicative that the head is forward of optimal alignment (Figure 1).
Position of Hands
This assessment can be used to evaluate the position of the arms, shoulder blades and thoracic spine. When the spine rounds forward, the shoulder blades protract and the arms internally rotate, making the back of your client’s hand(s) visible when he or she is facing you. Therefore, evaluating the position of your client’s hands can also enable you to assess the position of his or her shoulder blades and thoracic spine.
How to Perform:
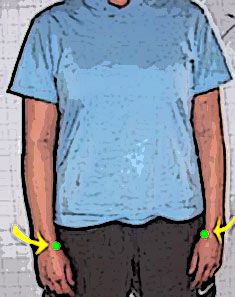
Instruct your client to stand in front of you in a comfortable position. Look at his or her hands and make a note of how many fingers are visible to you. If your client’s arms, shoulder blades and thoracic spine are in the correct position, you should see only his or her thumb, index finger and part of the middle finger. If you can see more than this (or the backs of the client’s hands), it is indicative that the arms are internally rotated, shoulder blades are protracted, and the thoracic spine is rounded forward (Figure 2). Also make a note if one arm is more internally rotated than the other (as evidenced by seeing more fingers on one side). This can mean the shoulder blade on that side is more protracted, which can affect the ability of the arm on that side to swing backward and the torso to rotate when walking or running.
Figure 2. Example of Internally Rotated Arms
From Assessment to Exercise
What follows are six exercises to help improve neck, shoulder, arm and thoracic spine function. Performing these exercises regularly will help alleviate pain in your client’s lower back (as well as in the rest of the body).
Corrective Exercises for the Neck, Upper Back, Shoulders and Arms
TheraCane On Neck
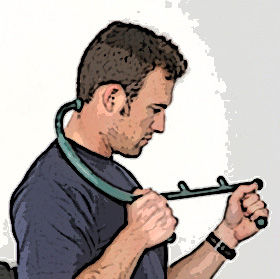
Sitting at a computer, driving, texting, watching television, cooking and reading can all cause the shoulders to round and the head to move forward. This can lead to excessive muscle tension in the neck and shoulders, and also make the lower back work harder as it tries to arch backward to keep the head and shoulders upright.
Instruct your clients to use a TheraCane to apply steady pressure to any sore spots he or she may feel on the back of the neck, from the top of the shoulders to the base of the skull. Perform for three to five minutes every day.
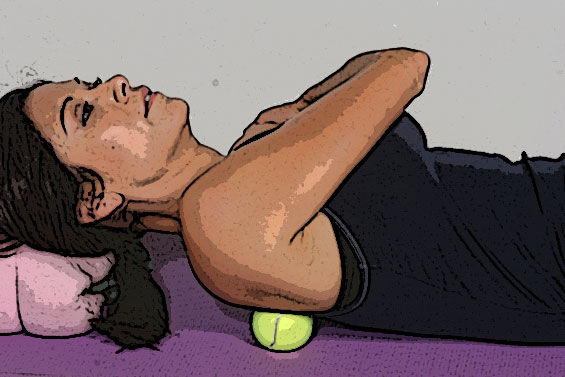
Tennis Ball Around Shoulder Blades
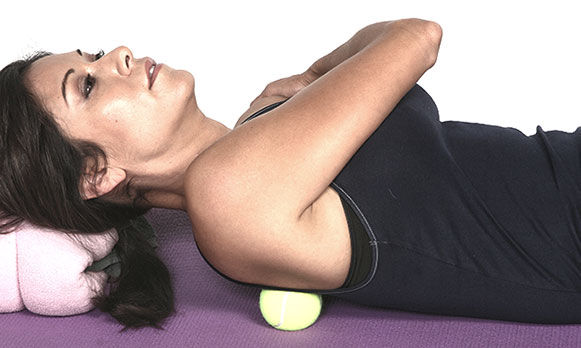
When the upper back rounds, the head drops forward and the scapulae move away from the spine. This causes tension in the muscles that help retract and depress the shoulder blades and hold the head up (i.e., rhomboids, trapezius) (Gray, 1995). This exercise rejuvenates and reconditions these muscles, thus taking unnecessary stress off the lower back.
Instruct your client to lie on the floor with the knees bent and head resting on a pillow. Pull one arm across the chest and place a tennis ball under the shoulder blade of that arm. Find a sore spot, hold to the release tension, and then move the ball gently to another spot. Hold for 20 to 30 seconds on each sore spot. Perform at least once per day.
Note: Do not roll around vigorously when performing this exercise.
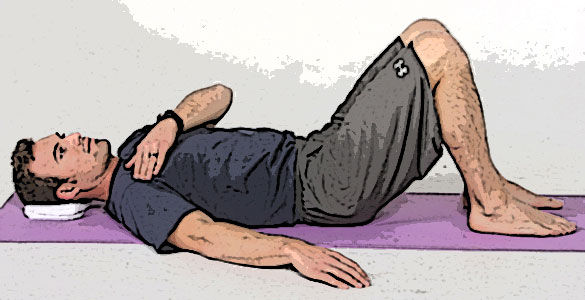
Chest/Front Of Shoulder Massage
Rounded shoulders can also lead to restrictions on the front of the body. Massaging the front of the shoulders and chest can enable clients to be more upright and pull the shoulder blades back correctly. Use this exercise as a warm-up to the “Why Stretch” exercise that follows.
Have the client lie on the floor with one arm outstretched and his or her head supported with a pillow, if needed. Instruct the client to use the opposite hand to massage the front of the shoulder and chest. Spend at least two to three minutes per day on all the sore areas. Clients also can perform this exercise by lying face down and placing a tennis ball under the chest and front of the shoulder.

“Why Stretch”
This is a great exercise to help retract and depress the shoulder blades and externally rotate the arms. It can be performed at any time during the day, sitting or standing, and will help encourage the upper back to the function better to take stress off the lower back.
Stand or sit and bring the arms out to the sides and slightly behind the body. Rotate the palms upward. Squeeze the shoulder muscles in the middle of the back to help pull the shoulder blades and arms back. Do not shrug. Hold this position for 10 to 15 seconds. Perform two to three repetitions once per day.
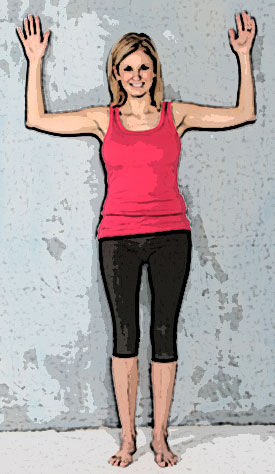
The “Wave Goodbye”
This exercise strengthens the muscles that help keep the torso upright, depress the shoulder blades and externally rotate the arms, thereby preventing the lower back from having to arch excessively to keep the body upright and balanced when moving.
Have your client stand against a wall with the lower back flat to the wall and elbows bent with the upper arm parallel to the floor (palms facing the floor). (Instruct your client to keep the pelvis tilted so the lower back is as flat to the wall as possible. This will ensure the lower back does not “cheat” as the client tries to perform the exercise.) Push the head and shoulders back to the wall, keeping the elbows slightly forward of the wall and tucking the chin in. Slowly rotate the backs of the hands toward the wall, while keeping the shoulders back and down. Hold this position for three to five seconds, and then slowly rotate the hands back to the starting position; rest and repeat. Perform three to six times at least once a day.
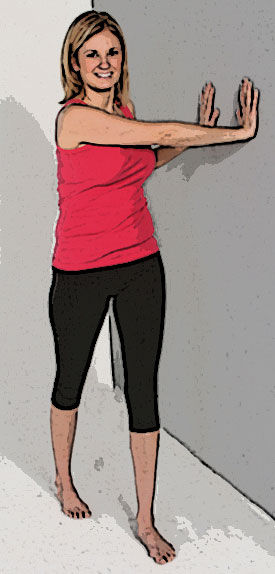
Wall Rotations
Sufficient mobility of the thoracic spine is extremely important in helping the upper body decelerate forces (i.e., gravity and impact) to the lower body and prevent the structures of the lower back from experiencing excessive stress. This exercise is designed to encourage the thoracic spine to rotate and the shoulder blades to retract when walking or running.
Have your client stand in a split step about 18 inches away from a wall, with the foot closest to the wall forward. Rotate the torso toward the wall until both hands can be placed on the wall. When the client can reach the wall, have him or her use the hands to help rotate even further toward the wall. As he or she rotates, make sure the hips stay square (i.e., do not let the hips move forward, backward or to the side). Instruct your client to keep the shoulders level and to not lean as he or she rotates. Keep the head facing forward and straight. Perform this exercise at least three to six times per day on each side.
When the structures in the upper body (i.e., thoracic spine, shoulders, arms and neck) are not doing their jobs well, the muscles of the lower back must take up the slack and end up becoming overworked. This causes muscle tension, which places pressure on nerves and shows up as pain. Retraining the upper body to function better can enable the workload to be spread evenly throughout the body and take stress off the lower back.
Become a BioMechanics Method® Corrective Exercise Specialist

Want to learn more about how you can help your clients who have low-back pain? The BioMechanics Method® Corrective Exercise Specialist online course (TBMM-CES) is specifically designed to give fitness professionals a step-by-step process for working with clients who experience muscle and joint pain. Created by Justin Price, one of the top musculoskeletal assessment and corrective exercise experts in the world, this course will give you the postural assessment, anatomy, corrective exercise and program design skills necessary to help clients become pain free. This self-paced study course is valued at 8.0 ACE CECs and includes digital textbooks, videos and online quizzes.
References
American Council on Exercise (2010). ACE Personal Trainer Manual (Fourth Edition). San Diego, Calif.: American Council on Exercise.
Gray, H. (1995). Gray’s Anatomy. New York: Barnes & Noble Books.
Kendall, F.P. et al. (2005). Muscles Testing and Function with Posture and Pain (5th ed.). Baltimore, Md.: Lippincott Williams & Wilkins.
Price, J. and Bratcher, M. (2010). The BioMechanics Method Corrective Exercise Educational Program. The BioMechanics Press.
Rolf, I.P. (1989). Rolfing: Reestablishing the Natural Alignment and Structural Integration of the Human Body for Vitality and Well-Being (revised edition). Rochester, Vt.: Healing Arts Press.


 by
by