Health and exercise pros advise clients to add variety to their workouts all the time—and we do our best to devise programs that meet these expectations. At the same time, however, it’s not uncommon for trainers to select the same pieces of equipment over and over because those tools are most familiar and they know what to do with them. If this sounds familiar, it’s time to get out of your comfort zone and start incorporating some new equipment into your clients’ workouts.
Perhaps there are one or two items on the gym floor where you train that you normally walk past on your way to the dumbbell rack. Or maybe you use certain items occasionally, but not habitually because you don’t know much about them. This article, part one of a two-part series, will help you branch out with strength and conditioning equipment. Learn important technique tips and a short routine you can do on your own or with clients using three popular, but often-underused items: Hyperwear SandBells, battle ropes and Lebert EQualizers.
Hyperwear SandBells
Expert Trainer: Brook Benten (Jimenez), M.Ed, owner of CardioPump Fitness, LLC and a Hyperwear SandBell certification provider in Austin, Texas
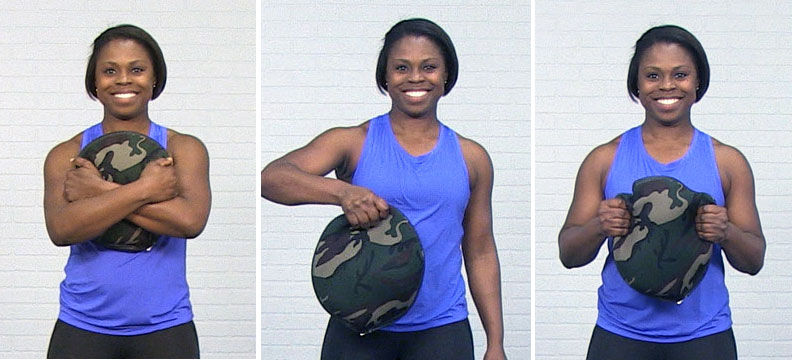
Getting Acquainted:SandBells look a bit like a flat medicine ball, but these neoprene bags filled with sand behave quite differently.
“The shifting sand makes it live, active weight. Unlike a medicine ball, the center of mass falls outside of your hands when held with certain grips,” explains Benten. As a stand-in for other gym equipment you might use often, the SandBell offers plenty of versatility: swing it like a kettlebell, toss it like a med ball, slide it like a disc and/or push and pull it like a dumbbell.
Unlike a dumbbell or kettlebell, however, SandBells don’t have handles. This is by design to increase grip strength.
“It’s harder to grip the bell without a handle, but that’s precisely the intention,” says Benten. “The goal is to improve grip and forearm flexor/extensor strength.”
Important Technique Tip: Make sure clients don’t grip the SandBell only by the neoprene material, which can damage the product, but more importantly, it misses the point. “It doesn’t allow you to strengthen your grip as you would if you were digging your fingers into the sand,” says Benten. “Always keep sand in your grip, and, as the granules start to slip out of your hand(s), shift the bag and re-grip.”
Warm-up: “With a SandBell workout, you will be flexing, extending, abducting, adducting and rotating,” says Benten. “Accordingly, your warm-up should include sagittal, frontal and transverse plane moves.”
The warm-up is also a good time to familiarize clients with the different handgrips and terminology:
A bear hug grip refers to holding the SandBell against your chest with the arms crossed in front, both hands holding the outer edges of the SandBell.
A claw grip is when you wrap one hand around the seam, neoprene and some sand, holding the object with most of the sand dangling outside of your grip.
A double claw grip is the same concept, but you use both hands, placing them together at either a 12 o’clock position or one hand at 3 o’clock and the other at 9 o’clock. “Any time your hand or hands are holding around the seam, neoprene and sand, it’s called a claw or double claw grip,” says Benten.
Basic Warm-up (Total time: Approximately 6 minutes)
1 minute: Lunge forward, doing a chest press with double claw grip
1 minute: Alternating hip abduction with bear hug grip
1 minute: Ribbons with double claw grip—bring SandBell up from one knee, rotating behind head and down to the other knee
Repeat: All three exercises one more time
Workout (Total time: Approximately 3 minutes with the option to rest and repeat the circuit a second time)
This “Wheel Workout” is a circuit that flows like a bicycle wheel, beginning in the “hub” (central exercise) and then hitting each “spoke” exercise. The idea is to repeat the hub exercise after each spoke exercise. In this drill, the hub exercise highlights the SandBell Slam, which Benten refers to as the “granddaddy of all SandBell exercises.”
10 SandBell Slams: Holding the SandBell with a double claw grip, hands at 3 o’clock and 9 o’clock, reach overhead and get onto your tiptoes, extending through the hips, knees and ankles. Do a squat as you lower the SandBell, “slamming” it onto the floor. Finish with shoulders extended and torso angled over the SandBell on the floor. Pick up the SandBell from a squat position and repeat.
10 Alternating Renegade Rows: From a plank position, hold the SandBell in the right hand with a claw grip. Row the right arm, with the elbow moving toward the ceiling behind you. Set the SandBell on the floor. Pick it up with your left hand and perform the row with your left arm. Repeat this sequence, counting the completion of one row on both sides as one rep.
10 SandBell Slams
10 Squats and Presses: Hold the SandBell with a double claw grip, hands at 3 o’clock and 9 o'clock, and squat down. As you stand up from the squat, straighten the arms overhead, aligning the wrists over the elbows and the elbows over the shoulders.
10 SandBell Slams
10 Front Two-handed Swings: With feet hip-width apart, the arms straight and the SandBell in a double claw grip with both hands at 12 o'clock, pull he hips back and push the SandBell between the upper inner thighs. (“Think of it like a loaded slingshot,” says Benten.) Thrust the hips forward as you stand straight, propelling the SandBell out and up to about should height (similar to a kettlebell swing).
10 SandBell Slams
Rest and repeat the circuit if desired.
Battle Ropes
Expert Trainer: Ingrid Marcum, C.S.C.S., performance enhancement specialist, Battling Ropes certification course instructor and Battling Ropes programming director in Nashville, Tenn.
Getting Acquainted: Although the appearance of rope training might intimidate some folks at first, it’s quite easy to teach the basics, according to Marcum. “There really isn’t much of a learning curve to be able to start training with ropes,” she says.
However, you should expect unique qualities and plenty of progressions associated with battle ropes (also known by the registered trademark name Battling Ropes). “There is no ‘recovery’ portion of the movement, which means you are working the entire time you’re moving the ropes,” explains Marcum. “Because there is no lull in the action, the ability to continue moving the ropes helps increase an individual’s overall work capacity.” This is something to keep in mind when selecting which clients are best suited for rope training.
Important Technique Tip:It’s common for people pull the ropes toward them as they move. Try not to do that, advises Marcum.
“Keep your hands, and therefore the ends of the ropes, the same distance from your anchor point the entire time,” urges Marcum. “Focus on sending your force down the length of the rope instead of up and down.” This ensures better force transfer and movement quality. In fact, “watch the rope,” says Marcum. It’ll actually tell you how well you’re moving and how much force and intensity you’re putting out. “The smoother the waves, the smoother and more efficiently you're moving,” she says.
Warm-up: Most people tense up when putting force into the ropes, so the warm-up is a good time to redirect that tendency.
“Ideally, your arms should move like the ropes move,” says Marcum, “in a wave-like motion.” Marching in place can help. “Get the feet moving and the body will learn to relax, which makes your waves more efficient,” says Marcum.
Alternating Waves Warm-up (Total time: Approximately 5 minutes)
Hold one rope in each hand with the end of the ropes at an arm’s length away from you. Pull the ropes until they are taut and then take one step forward. This helps prevent the common mistake of holding the ropes too taut. (“It’s better to have a little more slack in the ropes,” says Marcum.) Perform alternating waves, moving the ropes up and down so that when the right arm moves up, the left arm moves down. At the same time, march in place. The goal is to work up to five minutes. To get there, try the following progressions for five minutes at a time.
30 seconds work/30 seconds rest
45 seconds work/15 seconds rest
2-3 minutes work/15-30 seconds rest
5 minutes straight
Workout (Total time: Approximately 5-10 minutes)
Outward Circles With Squats: Stand with feet hip-width apart with the end of a rope in each hand at arm’s length away from you. Keeping the hands below your shoulders, open the arms out and away from you and then back to the starting position, creating a circular motion. At the same time, perform a squat. Continue for 30 to 60 seconds, and then rest for 30 to 60 seconds. Repeat for four to five rounds.
Plank Forward Pull: Release one rope from its anchor and lay the rope on the floor in a pile. Grab one end of the rope and walk or jog about 20 feet away from the pile, getting into a straight-arm plank position on the floor. Balance on your left hand with the right hand in the air and gripping the rope. Using your right arm, continually pull the rope toward you until the entire length of the rope is under your body. Maintain good plank posture throughout. Reset the rope and repeat the sequence, pulling with your left arm. Perform this exercise one to three times per side.
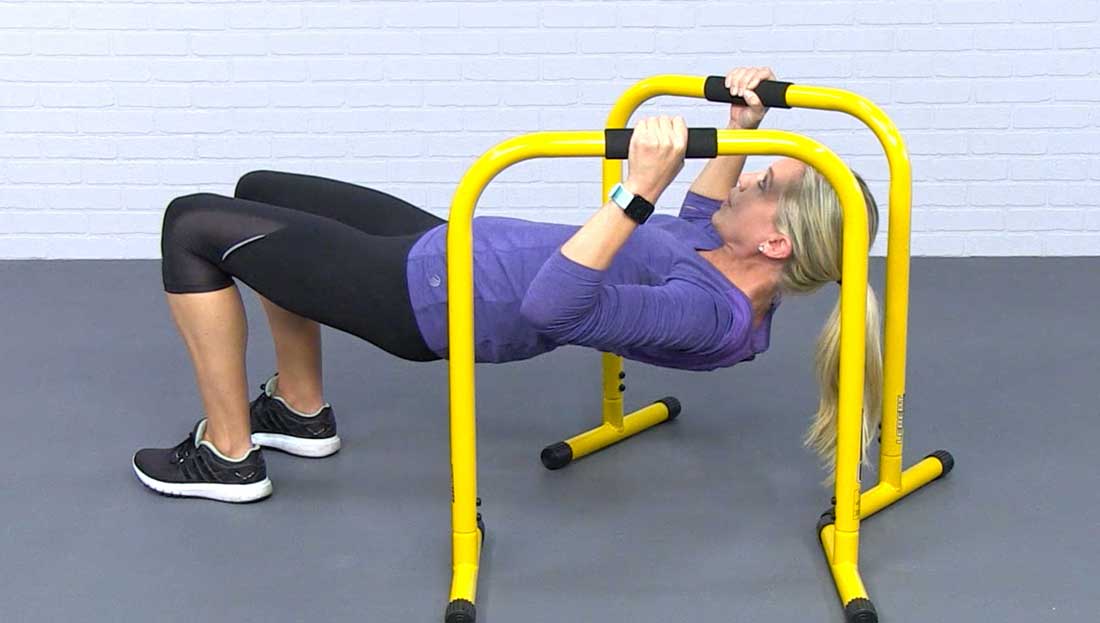
Lebert EQualizers®
Expert Trainer: Marc Lebert, personal trainer, creator of the Lebert EQualizer bars and president of Lebert Fitness in Toronto, Ontario
Getting Acquainted: Despite their visual simplicity, the EQualizers provide dozens of variations on most common exercises, and some unique ones, as well.
“Trainers who attend our conference sessions often go in thinking the EQualizers are basically dip bars or hurdles, but they leave knowing the bars can be used for warming up, agility, compound strength moves, stretching and more,” says Lebert.
The bars, which come in a few versions and weigh between 8 and 10 pounds, are designed for body-weight training, but you can also lift them. Depending on what you do with them, the EQualizers render typical exercises either harder (e.g., place the back foot on a bar during lunges) or easier (e.g., lay the bar down to do wrist-friendly, incline push-ups or burpees).
Important Technique Tip: The bars come in a set of two, which you can use together or separately. When pairing them up, always check that you’ve got the spacing right to protect your shoulders. “Make sure the bars are never too far apart,” advises Lebert. A lot of exercises work well with the bars in a “V” position, where the bottom, stabilizing bars (called the feet) touch each other while the other end remains open about 12 inches. Also, when performing any exercise where both feet leave the floor, such as with advanced triceps dips, always place the hands on the foam handgrips in the middle of the bars.
Warm-up (Total time: Approximately 3 minutes)
This warm-up uses one EQualizer bar in two distinct ways.
1 minute: Lay one bar on its side, using it like an agility ladder as you step laterally from the left side of the bar, into the middle, and out onto the right side of the bar. Repeat the sequence while moving right to left.
30 seconds: Stand with feet hip-width apart and one hand on either side of an EQualizer lifted to shoulder height, palms facing in. Perform a squat and, at the same time, straighten the arms and raise the bar overhead. Stand up, bending the arms and lowering the bar back to shoulder height. Repeat sequence.
Repeat for two rounds total.
Workout: (Approximately 5-9 minutes)
This push/pull drill is a mix of cardio and strength exercises, and requires both bars. Complete each exercise for 30 seconds, and rest up to 30 seconds between each interval (fitter clients may be able to perform the intervals without resting in between).
Incline Chest Press: With the bars in a “V” position, place hands on the outside curve of the bars and get into a plank position with the legs straight. You should be balancing on your hands and toes as you bend the arms, lowering your body toward the bars in a push-up.
Inverted Rows: With bars in a “V” position, get into a supine pull-up position with feet flat on floor, legs bent to 90 degrees, hips high and hands on foam handgrips. Your head should extend just beyond the narrower end of the bars (the side where the feet touch each other). Pull yourself up toward the bars, keeping head and hips aligned. Pause, then lower to starting position.
Agility Drill: Lay both bars on their sides next to each other with about 20 inches of space between the two bars. Perform the agility drill described in the warm-up, moving laterally across both bars this time and going at a faster pace. Focus on driving the arms and lifting the knees. For more intensity, add a burpee at each end, placing hands on the bar instead of the floor.
Repeat sequence up to three rounds total.
Sign up to receive CERTIFIED™
CERTIFIED™ is a free online monthly publication from ACE designed to equip certified fitness professionals and health professionals alike with the knowledge they need to continue growing.
Author
Amanda Vogel
Health and Fitness Expert
Amanda Vogel, MA human kinetics, is a certified fitness instructor and the owner of fitnesswriter.com, a website that teaches fitness pros how to make money writing and blogging about health and fitness. Amanda is a Hootsuite-certified social media consultant for the fitness industry and a presenter at top conferences, including IDEA World and NASM Optima. In addition to blogging at FitnessTestDrive.com about fit tech, workout gear and exercise clothes, she writes for popular magazines, including IDEA Fitness Journal, Best Health and Reader’s Digest. Find her on Instagram at @amandavogelfitness.
CERTIFIED™ is a free online monthly publication from ACE designed to equip certified fitness professionals and health professionals alike with the knowledge they need to continue growing.


 by
by