Phase 1 of the functional movement and resistance training component of the ACE Integrated Fitness Training® (ACE IFT®) Model involves stability and mobility training for an important reason: The starting point for most personal-training clients includes the need to improve muscle balance, muscular endurance, core function, flexibility, and static and dynamic balance. The combined objective of all of these elements is to establish a relatively neutral posture that forms the foundation for all of the movements and exercises that will be introduced in subsequent phases. A person can’t move efficiently and effectively from a faulty starting position.
No matter what certification you hold or type of client or participant you work with, an understanding of the kinetic chain is essential to creating a safe and effective program or class for previously sedentary individuals who are at the very starting point in their quest for a better, more active lifestyle.
While all joints demonstrate varying levels of stability and mobility, they favor one over the other depending on their primary function (see figure, below). For example, the lumbar spine is generally stable in an effort to protect the low back from injury. It does, however, provide some mobility during movements requiring rotation of the upper body. This is why it is so important to train the body as a whole, being careful to never sacrifice mobility for the sake of stability, or vice versa.
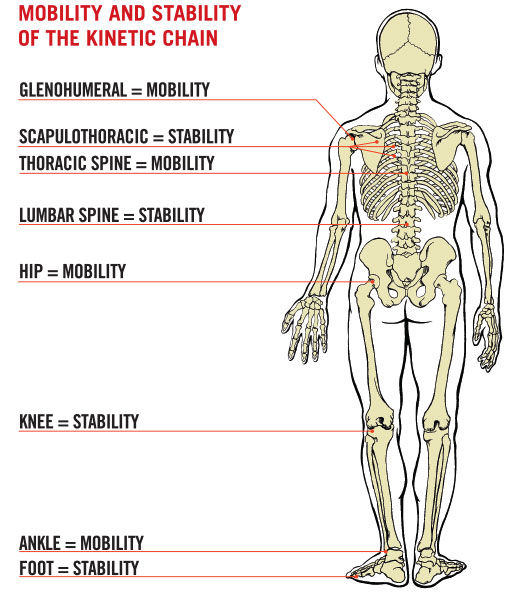
Individuals who have good posture typically demonstrate an appropriate relationship between stability and mobility throughout the kinetic chain. But what happens when one of those two elements of good posture is out of sync? If a joint lacks the necessary mobility to perform a movement properly, the body will often draw on adjacent joints—which are designed to favor stability—to become more mobile, which throws the entire system out of whack. This is one way movement compensations and chronic injuries develop, as compromised function moves from one link of the chain to the next.
Assessing the Situation
Each of ACE’s manuals—including the ACE Personal Trainer Manual, ACE Health Coach Manual and ACE Group Fitness Instructor Handbook—presents assessments that can be used by health and fitness professionals to evaluate the various elements that may compromise the functioning of the kinetic chain. While the selection and timing of assessments is up to you as a professional depending on the needs and goals of individual clients or participants, the following assessments are appropriate in the early stages and will yield a lot of information that will inform your subsequent choices about which exercises to include in those first weeks of participation:
- Static postural assessment: This includes an evaluation of any postural deviations, which are detailed in the ACE Personal Trainer Manual.
- Movement screens: This involves observations of how the body performs certain basic movements, such as squats and overhead reaches.
- Flexibility and muscle-length testing: You may elect to assess the flexibility and range of motion of specific muscle groups you think may be tight based on the postural assessment and movement screens.
- Balance and core assessments: Static balance and core strength and stability are essential elements of the proper performance of many activities of daily living.
Tips for Group Fitness Instructors
The assessment process can be a little more difficult for group fitness instructors (GFIs), who are working with large groups of participants and don’t typically perform extensive pre-participation assessments or screens. GFIs are challenged with leading a safe, effective class for whoever walks through that door—whether or not the GFI has even met them before.
Observation is the key. GFIs should be carefully observing the class and evaluating each participant’s posture, exercise technique and tolerance to fatigue throughout a class, and this is particularly true for new participants. GFIs should be continually cueing proper posture and technique throughout class. These reminders will help participants perform movements from a proper starting point. You can even begin each class by asking participants if they are aware of the type or intensity level of the class as they enter the room, perhaps even asking newcomers if they have any limitations or health issues of which you should be aware.
GFIs should also be sure to lead participants through full-range-of-motion exercises. In addition, GFIs should keep an eye out for anyone whose form is being compromised, especially late in a class session. This is a clear sign of fatigue and indicates the need to offer regressions to the movements being performed. Remind participants that pushing themselves to the point of using bad form is a recipe for injury.
It is essential that the results of these and any other assessments performed be used to create an individualized program for each client and not just filed away in a drawer after completion. Be sure to discuss any deficiencies you’ve uncovered and educate the client on their long-term ramifications, as well as the ways in which you plan to address them. From there, you can develop and implement an exercise program to address any postural or movement issues before moving on to adding more complex exercises or introducing external resistance. The last thing you want to do as a health and fitness professional is to add external loads to a faulty movement pattern.
Exercises for the Kinetic Chain
Exercises in this initial training phase should focus on the development of the stability–mobility relationships within the kinetic chain. Justin Price, creator of The BioMechanics Method Corrective Exercise Specialty Certification endorsed by ACE, offers the following exercises, all of which are part of The BioMechanics Method. It is important to note that these exercises are not meant to be performed in a single workout or as a full-body circuit, as it is up to the health and fitness professional to determine the needs of each client or participant and select exercises accordingly. Instead, these exercises are meant to reflect the stability–mobility needs of the kinetic chain, as presented in Figure 1.
Let’s start from the top…

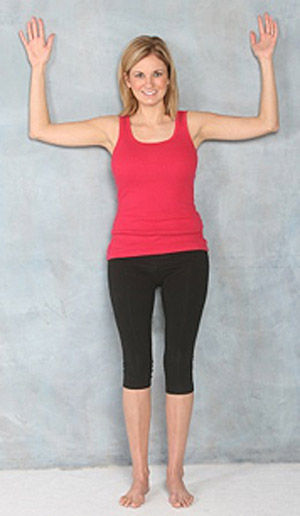
Glenohumeral Mobility: Palm on Wall Stretch
This exercise is designed to stretch the muscles of the arm to help mobilize the glenohumeral joint. Price recommends having clients or participants perform self–myofascial release for the muscles of the forearm, upper arm and shoulder before attempting this movement to ensure that these muscles are adequately warmed up. It is also important that they first perform the “wave goodbye” exercise presented below to learn to hold the shoulder blade still during this exercise.
Stand facing a wall and extend your left arm at shoulder level, with your palm flat on the wall and arm straight. Pull your left shoulder blade back and down and gently turn your right shoulder away from the wall while still maintaining the stabilized shoulder blade position on your left side and a straight left arm. Progress this exercise by gently trying to rotate your left arm forward without moving your palm on the wall. The rotation of the arm should happen at the glenohumeral joint, elbow and wrist, not by sliding the palm forward. Perform for 10 to 20 seconds on both sides once a day.
Scapulothoracic Stability: Wave Goodbye
This exercise strengthens the muscles that help stabilize the shoulder blade on the back of the rib cage.
Stand against a wall with your lower back flat to the wall and elbows bent with the upper arms parallel to the floor (palms facing the floor). Keep your pelvis tilted so your lower back is as flat to the wall as possible. This will ensure that your lower back does not “cheat” as you to try to perform the exercise. Push your head and shoulders back to the wall, keep the elbows slightly forward of the wall and tuck your chin in. Slowly rotate the backs of your hands toward the wall, keeping your shoulder blades in a stabilized back and down position throughout the entire movement. Hold this position for three to five seconds, and then slowly rotate your hands back to the starting position, rest and repeat. Perform three to six times once a day.

Thoracic Spine Mobility: Wall Rotation Stretch
This exercise is designed to stretch the muscles of the trunk to increase thoracic spine mobility.
Stand about 12 inches away from a wall on your left-hand side. Position your left foot forward and your right foot back with your feet straight. Rotate your torso to the wall and use your hands to create more rotation. You should feel a stretch around your torso and tension behind the left shoulder blade as you retract that shoulder. As you are performing this stretch, you may notice your hips move and/or your spine bend to the side in an effort to achieve the attempted movement. You can correct this by pulling your right hip back gently as you are rotating your torso to the left (and vice versa if performing this stretch on the other side). Hold for 30 seconds on each side once per day.
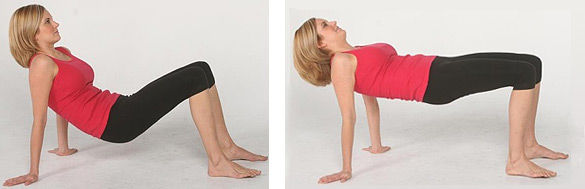
Lumbar Spine Stability: Butt Lift
This exercise is designed to strengthen the muscles that help stabilize the lumbar spine and the lumbo-pelvic girdle.
Begin by sitting down on the floor with your knees bent and hands placed behind you. Align your feet so that they are pointing forward. Posteriorly tilt the pelvis to help maintain a neutral pelvic position as you lift your hips off the floor. It is also extremely important to keep your hips level from left to right as you lift to help correct any imbalances that may exist. Slowly lower your hips, maintaining a level and neutral pelvic position throughout the movement. Perform 10 to 12 repetitions once or twice per day.
You can progress this exercise by lifting one leg off the floor as you lift and lower your hips. However, you should only progress to this more advanced version when you can keep your hips level left to right during both the lifting and lowering movements.
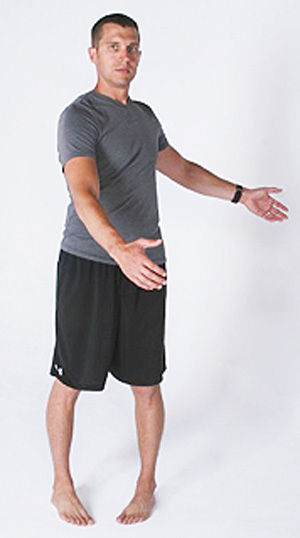
Hip Mobility: Toes-in Torso Rotations
This exercise is designed to stretch the muscles that cross the hip, thereby increasing mobility and the legs’ ability to internally rotate in the hip socket. Price notes that it is important to warm up the muscles of the hips and lower back before performing this exercise. Self–myofascial release can be used to target the larger muscles of the legs, buttocks and lower back.
Stand with your feet hip-width apart and turned in like a pigeon. Rotate your torso to the left, keeping your left big toe in contact with the floor and preventing your toes/foot from sliding to the left. Perform this movement gently at first, as any immobility in the hips may be experienced as tightness or discomfort in the lower back. Perform this exercise at least once a day for eight to 10 rotations to each side.
Knee Stability: Lunge With Knee Pull
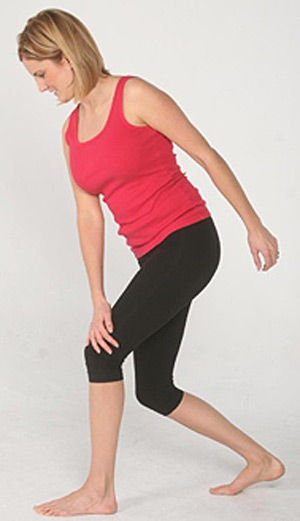 This exercise strengthens the muscles that help stabilize the knee while also mobilizing the joints above and below (i.e., the hips and ankles). Price advises clients to mobilize the hips and ankles using the toes-in and toes-out torso rotation exercises before performing this knee stability exercise.
This exercise combines isometric, concentric and eccentric movements that strengthen the muscles of the foot, ankle, lower leg, quadriceps and gluteal complex.
Stand in a staggered lunge position with your left foot forward. Bend at your hips (without rounding your spine), rotate your torso and grab the outside of your left knee with your right hand. Slowly bend your knees and lunge gently as you pull your left knee toward the midline of your body. As you pull your left knee inward, rotate your left shoulder backward so your spine and rib cage turn behind your left hip. As your weight is transferred forward onto your left leg, push your left big toe down into the floor (as in the “big toes push-down” exercise presented below) to help stabilize your foot. You should feel all the muscles in your left gluteal complex and leg as they contract to stabilize your knee. Return to the starting position and perform six to 10 repetitions on each side for one to two sets at least three times per week.
Ankle Mobility: Toes-out Torso Rotations
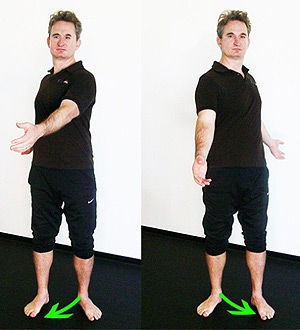 This exercise stretches the muscles that wrap around the ankle and attach under the foot, thereby increasing the mobility of the ankle. Again, Price suggests having clients warm up the muscles of the feet and ankles using self–myofascial release on the larger muscles of the area.
Stand with your feet hip-width apart and turned out like a duck. Rotate your torso to the right and let your left foot and ankle collapse inward as you allow your left knee to bend slightly. Now rotate to the left and allow your right foot and ankle to collapse and your right knee to bend slightly. Make sure you do not slide your foot on the floor as you perform this movement. Do this movement gently at first and if you experience discomfort in either knee, simply do not turn your feet out quite so much and this will alleviate the problem. Perform this exercise at least once a day for eight to 10 rotations to each side.
Foot Stability: Big Toes Push-downs
This exercise strengthens the soft-tissue structures that help make up the medial longitudinal arch of the foot, which runs from the heel to the big toe, to help provide stability to the foot and prevent it from collapsing.
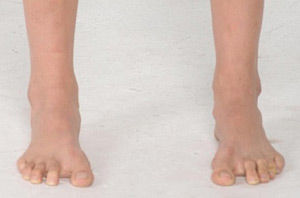 Stand with your feet facing forward. Spread your big toes away from your second toes on both sides. If you do not have enough strength or coordination to spread your big toes toward the midline of your body, bend down and use your fingers to move them to the correct starting position. With your big toes spread, gently raise the arches of your feet so your body weight shifts toward the outside of your feet. As you raise your arches, make sure your big toes stay in contact with the floor and do not slide toward your second toes. In this position, gently push your big toe down into the floor until you feel the muscle under the arch of your foot contract.
Once you are used to the feeling of this muscle contracting isometrically, progress this exercise by gently rocking your body weight forward until some pressure transfers into your feet. As your weight transfers forward, push your big toes down hard into the floor to help stabilize your foot and stop it from collapsing (i.e., overpronating). Perform this exercise for eight to 10 repetitions once per day.
Become a BioMechanics Method® Corrective Exercise Specialist

Want to learn more about how you can help your clients exercise with less pain? The BioMechanics Method® Corrective Exercise Specialist online course (TBMM-CES) is specifically designed to give fitness professionals a step-by-step process for helping clients overcome muscle and joint pain. Created by Justin Price, one of the top musculoskeletal assessment and corrective exercise experts in the world, this course will give you the postural assessment, anatomy, corrective exercise and program design skills necessary to help clients become pain free. This self-paced study course is valued at 8.0 ACE CECs and includes digital textbooks, videos and online quizzes.


 by
by