Back pain was recently identified as the leading cause of disability in the world (Hoy et al., 2014). This pain can have a devastating impact on people’s lives, affecting both their mental and physical state, as well as their ability to enjoy movement and exercise. Among the most common sources of back pain are herniated discs. This article examines what herniated discs are, what causes them and what you can do within your scope of practice as a fitness professional to help clients manage this common and often debilitating problem.
Staying Within Your Scope of Practice
It is not appropriate or within your scope of practice as a fitness professional to diagnose a herniated disc(s). That is the responsibility of licensed medical professionals who are trained in the assessment and diagnosis of such conditions. However, because many of your clients will come to you with this diagnosis, it is your responsibility (and well within your scope of practice) to understand what herniated discs are, how they are caused and what you can do to address your client’s underlying musculoskeletal problems to help alleviate their painful symptoms (American Council on Exercise, 2010).
What is a Herniated Disc?
The spine is made up of bones (i.e., vertebrae) that are stacked on top of one another. Each pair of vertebrae has cushioning between them (i.e., discs) that function as shock absorbers and enable movement of the spine (Figure 1) (Gray, 1995). 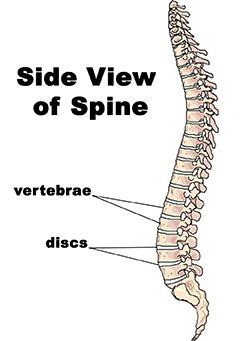
Figure 1: The Spine
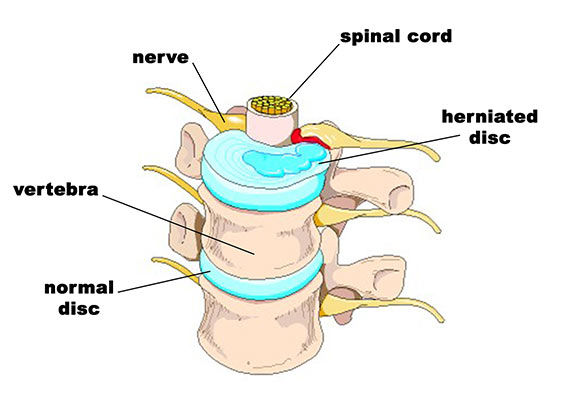
During certain movements, over time as a result of wear and tear, and/or under certain conditions, a disc can become damaged and rupture allowing the “stuffing” to leak out, which puts pressure on the spinal cord and other nerves (Figure 2). A disc that has been damaged in this way is called a herniated disc. This pressure on the spinal cord and surrounding nerves can cause local pain near the site of the herniation and/or referred symptoms into the buttocks and down the legs (McGill, 2002). While any disc in the spine may become herniated, those of the lumbar area (the lower back) are particularly vulnerable to this condition.
Figure 2: A Herniated Disc
What Can Cause a Herniated Disc?
Compared to other parts of the body, the spine is fairly inflexible. While it can move forward, backward, side to side and in rotation, there are other areas of the body such as the ankles, hips and shoulders that can perform these movements more easily (Cook, 2010; McGill, 2002). However, many people have restrictions in these other areas as a result of lifestyle habits, injuries, muscle weaknesses, stress and/or joint changes, and consequently, these parts do not work as they should. This results in the spine trying to compensate for the lack of movement elsewhere, which can ultimately lead to overuse and injury (Price and Bratcher, 2010).
There are many changes in the body that can set up the back for injuries such as disc herniation. For example, prolonged periods of sitting makes the entire spine round forward (i.e., flex). While the upper back (i.e., thoracic spine) already has a natural forward curve in it, the lower back does not. The simple act of sitting for long periods of time, therefore, places the lumbar spine in an unnatural position, which can eventually predispose the discs in the lower back to herniation. Additionally, it can exacerbate the symptoms experienced by people with this condition (McGill, 2002). Prolonged seated postures can also lead to immobility and dysfunction elsewhere in the body. When a person is constantly in seated positions, the feet and ankles do not have to bear the weight of the body, which can cause them to become weak and inflexible. The hips and surrounding muscles also lose their ability to function properly, as they remain motionless because they are supported by a seat most of the day. The shoulders become habitually rounded forward to enable the hands to type on electronic devices, drive or change the channel on the remote control, which decreases the ability of the arms, shoulders and neck to move freely and function optimally (American Council on Exercise, 2010).
The musculoskeletal imbalances described above can also prevent an injury to the spine from healing. For example, bending over to pick something up off the ground (or a low surface) requires the ankles, knees and hips to all bend together. Likewise, sports such as golf, tennis and baseball, and exercises and activities such as wood chopping, tossing a medicine ball and unloading groceries out of the car all require the torso to rotate (and bend) energetically. However, if the ankles, knees, hips and thoracic spine lack the mobility and muscle strength needed to perform these movements, the lower back has to accomplish the task of bending and twisting on its own. This added stress to the lumbar spine can delay healing of a herniated disc (Whiting et al., 1998).
What Can a Fitness Professional Do to Help?
The key to helping clients overcome the disabling effects of a herniated disc is to implement exercise programming that facilitates movement and mobility in other areas of the body such as the feet, ankles, knees, hips, thoracic spine and shoulder girdle. If clients are able to move up and down, forward and backward, side to side and in rotation by using all of the parts of their body that were designed to achieve these movements, stress will be dissipated throughout the entire kinetic chain. This will help injuries heal and reduce the likelihood of damaging the structures of the spine in the first place.
Feet and Ankles
When the body engages in dynamic movements that require forceful rotation (like playing golf), the feet and ankles should be able to roll inward and outward. This mobility facilitates correct functioning of the legs and hips (i.e., inward and outward rotation) and reduces stress to the back. The ankle must also be able to bend forward (i.e., dorsiflex) when the knee is bent to enable hip flexion (for activities like squatting) and also when it is straight to enable hip extension (for activities like walking). The ability of the ankle to bend properly prevents unnecessary stress to the structures of the back.
Hips
As mentioned above, the hips need to be able to rotate inward and outward, flex and extend. If the hips cannot perform these movements correctly, excessive stress is transferred to the spine and structural damage (such as herniated discs) can occur or may be delayed from healing.
Thoracic Spine and Shoulders
The legs, hips and spine should all be able to rotate when moving dynamically. However, if the thoracic spine (which has better rotational capability than the lumbar spine) lacks the ability to rotate because of restrictions caused by imbalances in the upper body, then the lower back experiences increased stressful rotation, which can cause strain and pain in that area. The thoracic spine must also be able to extend to perform activities such as catching a fly ball or reaching up over the head. However, if the upper back and shoulders are habitually rounded from prolonged seated postures, they lack the ability to extend when necessary. The lower back must then overarch to achieve this movement. Therefore, to help reduce the likelihood of a herniated disc in the lower back, it is important to maintain the ability of the thoracic spine to rotate and extend.
What Corrective Exercise Strategies Should Be Implemented?
Before trying to gain mobility in the feet, ankles, knees, hips, thoracic spine and shoulders with the following exercises, have your client perform self-myofascial release (SMR) techniques on the muscles that cross those joints (i.e., the feet, calves, quadriceps, hamstrings, hip-flexors, glutes, upper back and shoulders) (Rolf, 1989). Once the tissues in these areas have been warmed up with SMR exercises, you can progress your client to gentle stretching/mobilization exercises (Myers, 2001). However, if a client experiences discomfort when performing any of these exercises, regress them back to performing more SMR techniques or to an easier version of the stretch/mobilization technique causing a problem before continuing with your mobilization program. For example, a standing calf stretch can be regressed by instructing your client to sit on the ground and use a towel to pull the toes toward the shin.
Stretch #1 - Foot and Ankle Stretch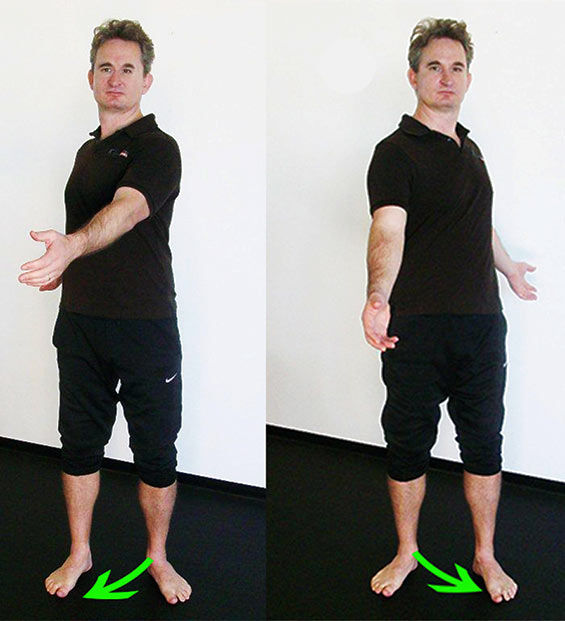
This dynamic stretch helps mobilize the foot and ankle so it can rotate more effectively.
Instruct your client to stand with his or her feet hip-width apart and turned out like a duck. Coach your client to rotate his or her torso to the right and let the left foot and ankle collapse as the left knee bends slightly. Next, instruct him or her to rotate to the left and let the right foot and ankle collapse as the right knee bends slightly. Watch to make sure your client does not slide his or her foot on the ground while performing this movement. Do this movement gently at first and if your client’s knee hurts simply instruct him or her not to turn the feet out quite so much. Your client should perform this exercise at least once a day for three to five rotations to both sides.
Stretch #2 - Calf Stretch (With Straight Leg)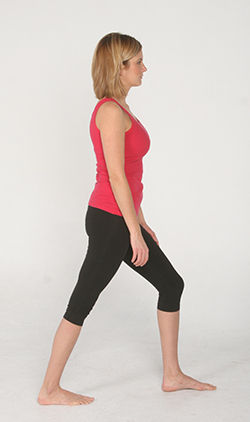
This stretch helps promote flexibility in the ankle when the knee is straight and the hip forward, which is what happens during walking. This ensures the leg can travel behind the hip correctly without the lower back having to overarch to keep the torso upright.
Instruct your client to assume a split stance (one foot forward, one foot back) with the feet pointed straight ahead. Coach your client to tuck the hips under until he or she feels a stretch in the calf. Perform for 20 to 30 seconds on each leg at least once a day.
Stretch #3 - Calf Stretch (With Bent Leg)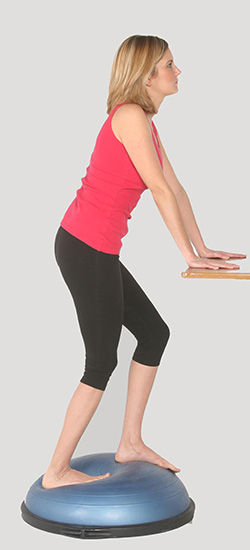
This stretch helps promote flexibility in the ankle when the knee is bent, which is what happens when squatting or bending down to pick something up off the ground. This ensures the ankles, knees and hips can bend effectively so the lower back does not have to over-round when lowering the torso.
Instruct your client to stand in a split stance on a BOSU Balance Trainer with his or her hands on a wall or desk to assist with balance. Coach your client to push the heel of the back foot down and bend the knee to feel the stretch in the calf muscles. Coach your client to not overpronate as he or she bends the knee. Perform this stretch on each leg for 30 to 60 seconds once a day.
Stretch #4 - Butt Stretch
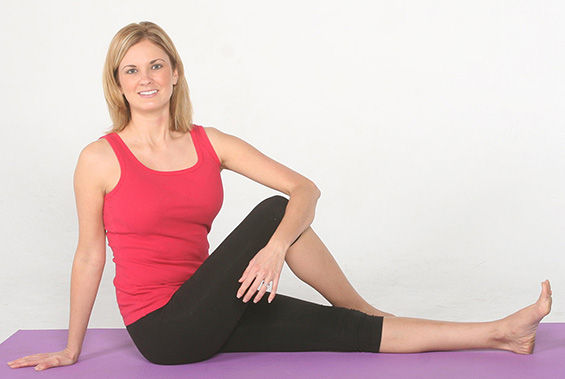 This stretch helps promote flexibility in the hip so the leg can come toward the torso and rotate across the body, which is what happens when bending and walking, thereby preventing excessive rotation in the lumbar spine.
Instruct your client to sit on the ground with the left leg straight, bend the right knee and place the right foot on the outside of the left knee. Coach your client to sit up tall and hug the right knee toward the left shoulder. Perform for 20 to 30 seconds each side at least once a day.
Stretch #5 – Hip and Butt Stretch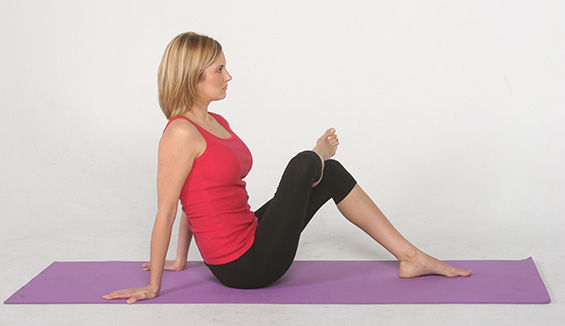
This stretch helps promote flexibility in the hips so the legs can rotate out, which is what happens when changing directions in sports, getting out of the car and during the backswing and follow-through in sports that require the body to rotate.
Instruct your client to sit on the ground with both knees bent. Coach your client to lift the right ankle and place it on the left knee. Make sure that your client is sitting upright and not rounding the spine. Perform for 20 to 30 seconds each side at least once a day.
Stretch #6 - Hip Flexor Stretch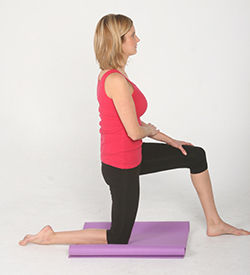
This stretch helps promote flexibility in the hips so that the leg can go behind the body without overarching the lower back and placing excessive stress on this area.
Instruct your client to kneel with one knee on the floor and the other foot forward. Place a mat or towel under the knee for comfort. Coach your client to tuck the hips under as he or she lifts the torso upright. Perform for 20 to 30 seconds each side at least once a day.
Stretch #7 - Hamstring Stretch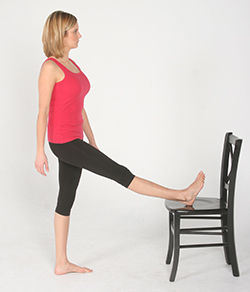
This stretch helps promote flexibility in the back of the leg so the torso can bend forward at the hips without placing excessive stress on the back.
Instruct your client to stand with the hips square and lift the right heel up onto a low chair or bench. Provide a balance aid if necessary to help the client keep the spine straight and hips level. Coach the client to gently pull the right hip back so that it comes back in line with the left hip. Perform for 20 to 30 seconds on each side at least once a day.
Stretch #8 – Doorframe Stretch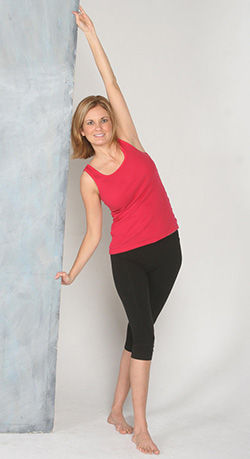
This stretch promotes flexibility in the torso so the thoracic spine can extend and the shoulder can flex correctly, which is what should happen when walking and/or reaching overhead.
Instruct your client to stand in a doorway. Have your client place his or her right arm on the doorframe at hip level and reach the left arm overhead and place it on the doorframe. Coach your client to place the left foot behind the right, tuck the pelvis under and gently lift the torso upright. Switch sides and arms to perform this stretch on the other side; perform this stretch at least once a day for 20 to 30 seconds on each side.
Stretch #9 - Wall Rotation Stretch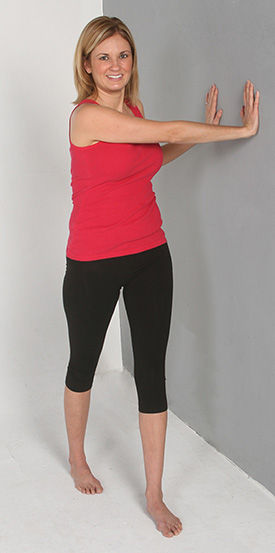
This stretch helps the torso and hips to rotate more effectively, which is what should happen when walking or playing sports. This ensures excessive rotational stress is not placed on the lower back.
Instruct your client to stand about 18 inches away from a wall, with his or her left side facing the wall. Coach your client to place the left foot forward, and, with both feet straight, rotate the torso toward the wall. Make sure your client’s hips remain square and shoulders stay level. Switch sides and perform this stretch for 20 to 30 seconds on each side at least once a day.
Conclusion
Back pain, especially the type experienced as a result of a herniated disc, can be debilitating. While it is not within your scope of practice to determine if a client has a disc herniation, you can use your knowledge of what causes it and how to facilitate better function in the rest of the body to help the problem heal or reduce the likelihood that will happen in the first place.
Become a BioMechanics Method® Corrective Exercise Specialist

Want to learn more about how you can help your clients who have low-back pain? The BioMechanics Method® Corrective Exercise Specialist online course (TBMM-CES) is specifically designed to give fitness professionals a step-by-step process for working with clients who experience muscle and joint pain. Created by Justin Price, one of the top musculoskeletal assessment and corrective exercise experts in the world, this course will give you the postural assessment, anatomy, corrective exercise and program design skills necessary to help clients become pain free. This self-paced study course is valued at 8.0 ACE CECs and includes digital textbooks, videos and online quizzes.
References
American Council on Exercise (2010). ACE Personal Trainer Manual (4th ed.) San Diego: American Council on Exercise.
Cook, G. (2010). Movement. Aptos, Calif.: On Target Publications.
Gray, H. (1995). Gray’s Anatomy. New York: Barnes & Noble Books.
Hoy, D. et al. (2014). The global burden of low back pain: Estimates from the Global Burden of Disease 2010 study. Annals of the Rheumatic Diseases, 73, 6, 968?974.
McGill, S. (2002). Low Back Disorders: Evidence Based Prevention and Rehabilitation. Champaign, Ill.: Human Kinetics.
Myers, T. (2001). Anatomy Trains: Myofascial Meridians for Manual and Movement Therapists. Edinburgh: Churchill Livingstone.
Price, J. and Bratcher, M. (2010). The BioMechanics Method Corrective Exercise Educational Program. The BioMechanics Press.
Rolf, I.P. (1989). Rolfing: Reestablishing the Natural Alignment and Structural Integration of the Human Body for Vitality and Well-Being (revised edition). Rochester, Vt.: Healing Arts Press.
Whiting, W.C. and Zernicke, R.F. (1998). Biomechanics of Musculoskeletal Injury. Champaign, Ill.: Human Kinetics.


 by
by