Plyometric exercise is a great way to add variety and intensity to a workout, but it’s not something every client should just, well, jump into. In fact, while many clients and some health and fitness pros might think of plyometrics as any exercise that involves jumping, it’s more than that.
A muscular action is plyometric when two things occur, says Jonathan Ross, award-winning fitness expert, creator of Funtensity™ and author of Abs Revealed. “There is a rapid stretch followed by a rapid contraction and the speed of that ‘rapid’ action is fast enough to activate the stretch reflex.” Keeping with that explanation, plyometric exercise can involve legs, arms, core, fingers, etc. “Clapping your hands is a plyometric muscular activity,” says Ross.
Of course, clapping doesn’t require much of a prelude—but more demanding moves do.
“An assessment of body mechanics or a basic movement screening…gives the trainer a good idea of how to introduce a progression of an exercise with consideration to injuries, muscular limitations, a client’s cognitive understanding, application to the movements, and more,” says Samantha Cordova, owner of MissFit Training in Alameda, Calif.
“We need to make sure people are ready,” affirms Ross. Take the popular squat jump as an example. At a foundational level, a client should be able to demonstrate proper upper-body posture, knee-ankle-hip alignment and good range of motion during a basic, low-impact squat. From there, you might incorporate what Ross refers to as “jumpless jumping.”
“This means you are squatting rapidly enough to meet the two criteria of ‘plyometric,’ but you are not leaving the ground,” he explains. If all that looks promising, then it might be time for squat jumps, perhaps at a slow tempo to begin. “This allows clients to focus on the beginning and end form until they can consistently perform the movement with more accuracy,” says Cordova.
“In general, it is safe to move quickly when you move well slowly,” says Ross. “If you can eliminate momentum, it shows you have neuromuscular control. If you have control, you can add speed safely.”
And with control comes confidence. “Being able to move with strength and speed is a huge confidence builder,” says Marc Coronel, member of the Under Armour Training Team, senior master course instructor for TRX and TriggerPoint, and fitness coach at Evolution Las Vegas. Coronel advises trainers to look for good physical form but also for a client’s self-awareness of that form. “The client needs to have earned [his or her] progression,” he says.
With that in mind, here are three exercises to try, each with multiple progressions that lead up to a rewarding plyometric conclusion.
Tripod Plank With Explosive Leg Switch
Trainer: Jonathan Ross
Trainer tips: Avoid skipping any of these progressions. Incorporate each progression into one or two workouts. Moving well in an explosive manner is about first fostering nervous system control.
Progression 1: Slow Alternating Switch Get into a plank position with legs straight, forearms and toes on the floor; position the forearms parallel to each other (like train tracks) to ensure good posture and less shoulder internal rotation. Slowly alternate lifting one foot, then the other foot about 6 to 12 inches off the floor, moving at a pace that takes about 4 seconds per side. Both feet should be on the floor between reps to reestablish stability.
Progression 2: Faster Alternating Switch Perform the same sequence as above, but at a faster pace (about a 2-second lift per side). Both feet should be on the floor between reps to reestablish stability.
Progression 3: One-foot Alternating Switch Increase speed even more, alternating leg switches at a faster and more continuous pace. Each alternating toe-touch to the floor takes about 1 second to complete. Only one foot is in contact with the floor at a time. Pause on landing to ensure stability before switching sides.
Progression 4: Explosive One-foot Alternating Switch Alternate feet with a more high-impact, or explosive, approach, as if continuously “hopping” from one foot to the other. Only one foot is in contact with the floor at a time. Briefly pause after each landing.
Progression 5: Explosive One-foot Alternating Switch, No Pause Alternate feet as above, but don’t pause on landing.
Progression 6: Explosive Alternating Kick From the plank position, alternate backward “kicks” into the air (knees may be slightly bent), explosively switching from side to side without pausing. Raise backward kicks high into the air until the feet are above the hips, ensuring that feet land in the same place on the floor from which they took off from.
Plié Jacks
Trainer: Marc Coronel
Trainer tips: Depending on the client, you could try this move with shoes or bare feet. Always ensure a soft landing and good body control. Listen to how the client lands to gauge how well he or she absorbs the impact and controls the descent of the squat—thumps indicate poor control.
Progression 1: Plié Squat With Floor Touch Stand in a plié-inspired position with feet slightly wider than hip-distance apart and toes turned out about 45 degrees. Inhale as you do a plié squat, reaching the right arm toward the floor. Touch the right hand to the floor between your feet. Exhale as you stand up, stepping the feet together and balancing on your toes with the heels off the floor. At the same time, extend the arms out to your sides at shoulder height, holding for 2 to 3 seconds. Step feet back into plié position and repeat the sequence, touching the left hand to the floor as you squat. Repeat this sequence, changing the lead leg each time you step in and out.
Progression 2: Plié Squat With Jump Perform the same sequence as above, but instead of stepping the feet wide into a plié position, jump both feet wide at the same time. Touch the floor with the right hand. Stand up, stepping the feet back together, arms extended out to the sides. Repeat the sequence, touching the left hand to the floor and changing the lead leg.
Progression 3: Plié Squat With Two Jumps Jump the feet wide into a plié squat, touching the floor with the right hand as in the previous progressions. Instead of stepping the feet together, jump both feet together, balancing on the toes at the end of the movement with the arms extended out to the sides. Repeat the sequence, touching the left hand to the floor.
Progression 4: Plié Squat With Air Jump the feet wide into a plié position and touch the floor with the right hand as in previous progressions. From the bottom of the plié squat, jump up into the air, bringing the feet and legs together, toes pointed and arms extended out to sides—both feet should leave the floor. Land with the feet wide in a plié position, bending the legs and touching the floor immediately. Repeat the sequence, touching the left hand to the floor.
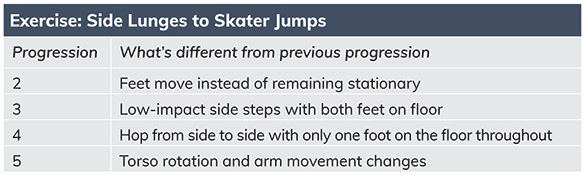
Side Lunges to Skater Jumps
Trainer: Samantha Cordova
Trainer tips: In early progressions, ensure the client can perform lateral movement without losing balance or rocking forward (having the client hold a TRX in front of the body while performing side lunges can help the client practice sitting back into the movement).
Progression 1: Alternating Side Lunge, Feet Stationary Position the feet wider than hip-distance apart. Bend the right leg into a side lunge, sitting back into the movement. Return to the starting position, with legs straight. Repeat the side lunge on the other side, bending the left leg. Continue to alternate side lunges. The feet should remain in the same position on the floor throughout.
Progression 2: Alternating Side Lunge, Feet Moving Start with the feet aligned under the hips with the legs straight. Step the right foot to the right, placing the feet wide enough apart to land into a side lunge as you bend the right leg. Step back to the starting position and repeat on the left side. Practice decelerating with control as you lower into the side lunge.
Progression 3: Skater Side-step With Hip Extension, Both Feet on Floor Take a wide step to the right as you extend the left leg behind you in a hip extension; the left leg is straight at the end of the movement, with the left foot touching the floor behind the body. At the same time, extend the left arm down and slightly across the body, so that the left hand is reaching toward the right foot. Keeping the feet wide, shift your bodyweight from one side to the other, alternating the low-impact movement pattern from right to left.
Progression 4: Skater Side-jump With Hip Extension, Front Foot on Floor Repeat the same sequence as progression 3, but hop from side to side, keeping the back foot lifted off the floor. Perform the lateral movement while balancing from the right to the left foot; only one foot (the front foot) is in contact with the floor throughout. Continue to reach toward the opposite foot as described in the progression above.
Progression 5: Skater Side-jump With Torso Rotation Perform the same sequence for the lower body as described in progression 4, but rotate both arms across the body as if passing a real or imaginary ball to someone beside you. When your right leg is in a hip extension behind you, rotate the torso and reach the arms across the body toward the left. You can alternate rotations from side to side or repeat one full set of rotations in one direction only before repeating on the other side.
Useful tools for plyo progressions include:
Plyo boxes (e.g., jumping/landing at various heights or as a learning tool for squatting range of motion and technique)
TRX Suspension Trainer (e.g., helps reduce impact on landing during squat jumps)
Slam ball, med ball, sandbag or Hyperwear Sandbell (e.g., upper-body plyometrics)
Step, Terra Core or Step 360 Balance Trainer (e.g., increases intensity and/or adds variety to a plyo move normally performed without equipment)
Sign up to receive CERTIFIED™
CERTIFIED™ is a free online monthly publication from ACE designed to equip certified fitness professionals and health professionals alike with the knowledge they need to continue growing.
Author
Amanda Vogel
Health and Fitness Expert
Amanda Vogel, MA human kinetics, is a certified fitness instructor and the owner of fitnesswriter.com, a website that teaches fitness pros how to make money writing and blogging about health and fitness. Amanda is a Hootsuite-certified social media consultant for the fitness industry and a presenter at top conferences, including IDEA World and NASM Optima. In addition to blogging at FitnessTestDrive.com about fit tech, workout gear and exercise clothes, she writes for popular magazines, including IDEA Fitness Journal, Best Health and Reader’s Digest. Find her on Instagram at @amandavogelfitness.
CERTIFIED™ is a free online monthly publication from ACE designed to equip certified fitness professionals and health professionals alike with the knowledge they need to continue growing.


 by
by 
 Trainer: Jonathan Ross
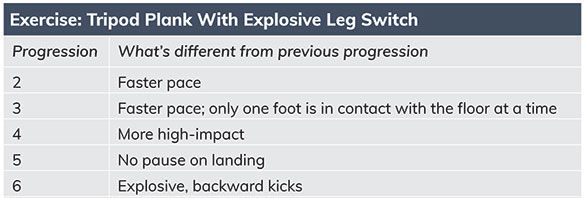
 Trainer: Marc Coronel
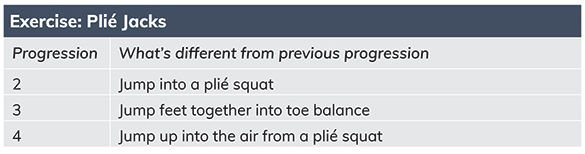
 Trainer: Samantha Cordova