Stressed out? Exhausted from hardcore workouts? Having trouble bouncing back? For many clients (and fitness pros!) these are day-to-day realities. Immersed in a fast-paced world crammed with high-intensity training and high-pressure demands, many of us find regular psychological and physical renewal all but impossible.
Yet recovery is critically important to mental health and fitness performance. So providing your clients with practical strategies for true relaxation increases the potency of the workouts you design, and enhances your value as a trainer.
Without question, yoga provides excellent opportunities for recovery. But restorative yoga—a specific, passive style of this popular mind-body technique—can be of particular use to fitness professionals with stressed-out, maxed-out clients. Here are practical strategies for introducing restoratives into your client’s everyday routines to promote recovery and relaxation.
What Is Restorative Yoga?
Yin vs. Restorative Yoga
To the casual observer, restorative yoga may look similar to yin yoga, which also emphasizes relaxation. However, the two are distinct.
Yin may or may not use props. And compared to restoratives, yin poses are held for much less time, and the intention is different. In yin, “there is [some] tension, stretch or stimulation in the body due to the positioning of the body,” says Pransky.
By contrast, in restorative yoga “there is no effort, contraction, stress or strain on muscle or connective tissue. This allows the body to have the opportunity to let go, and be completely at rest,” Pransky explains.
Restorative yoga combats fatigue, balances tight muscles, reduces overtraining injuries, speeds recovery from illness or injury, and reduces depression and anxiety, says Beth Shaw. Shaw is the Los Angeles-based founder of YogaFit®, an ACE educational partner that has trained more than 200,000 instructors worldwide, including in restoratives. Restorative yoga also activates the parasympathetic nervous system, also known as the “rest and relaxation” or “rest and digest” response.
In more athletic yogic styles (such as power or Bikram yoga), poses are actively held so as to build muscular strength and flexibility. By contrast, restorative yoga is a physically passive practice. Supportive props such as bolsters (large foam rolls or pillows) are used to support the limbs and/or spine. Most restorative postures are sustained for a relatively long time—often from five to 20 minutes each. And most are performed lying down, either supine or prone, with deep relaxation as the goal.
Prop Protocols
Props are essential in restorative yoga, says Lynn Burgess, M.B.A., a teacher of yoga teachers and owner of Yoga From the Heart, a studio in Sarasota, Fla. Props may include sandbags, blankets, blocks, bean bags, bolsters or straps. If you don’t have these, you can substitute what is on hand—folded blankets, pillows, couch cushions, rolled-up towels or yoga mats, or an ottoman can work. Props are either placed under body parts—to create support—or, conversely, on top of the body to simulate a grounding pressure.
“There is a basic prop set-up for each pose, but some adjustments may be needed for the individual comfort,” says Burgess.
“If a limb is not well-supported or the client feels a lot of sensation, the pose is ill-supported,” explains Leeann Carey, an ACE Certified Group Fitness Instructor based in Redondo Beach, Calif. “Support, alignment and deep relaxation are valued over depth of stretch.” Cue carefully, mindfully observe the client and ask for feedback to ensure this happens, Burgess adds.
Cueing Restoratives
Fitness professionals who are less familiar with mind-body work should start with breath- and body-focused cues for restorative positions, says Jillian Pransky, the National Director of Therapeutic Restorative Teacher Training for YogaWorks.
Pransky, who teaches throughout the U.S., recommends using anatomical cues in a progressive sequence. For example: “As you inhale, firm the muscles of your thigh. As you exhale, release and feel the props under your leg holding your leg up.”
It also helps to replace “directive cues” with “open-ended inquiries,” says Carey, who is also creator of Yapana restorative yoga therapy.
“Instead of saying, ‘drop your right knee out to the right to stretch it out,’ consider saying: ‘Drop your right knee out to the right side. Do you feel the stretch? Notice where the greatest sensation is and take a slow inhale. When you exhale, deliberately relax’” suggests Carey.
Finally, find more than one way to say “relax.” Instead, try words like soften, melt, let go, release, sink or surrender, adds Burgess.
Poses to Recommend
Ideally, one should practice restorative yoga three times per week, although one pose per day is a practical goal, says Shaw.
As a fitness professional, you could incorporate one or two restorative poses into the end of a personal-training session. Or, teach your clients the poses and ask them to do one every night, or whenever they are feeling particularly stressed.
Encourage beginners to progressively relax for two to five minutes in each pose, while more advanced participants can do five to 20 minutes, says Pransky.
Note that whatever precautions you would take for specific injuries or illnesses in a personal-training program generally also apply when introducing restorative positions, adds Burgess.
Here are some poses to recommend:
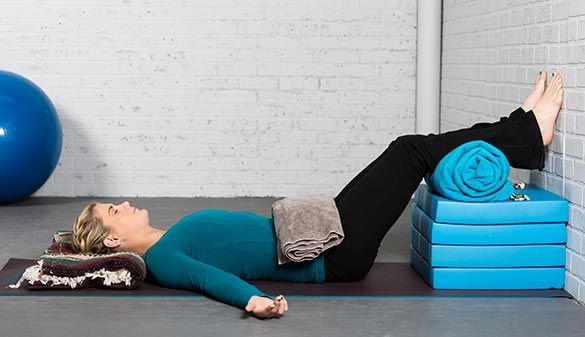
Legs-up-the-wall Variation
How: Lie on the floor with calves and feet supported by bolsters, blanket-covered blocks, or up on an ottoman. If possible, rest the soles of the feet against the wall. Place an additional folded blanket across the pelvis to help release tension there and to encourage the pelvis to rest more heavily on the ground. Rest arms by sides. Option: Place a small folded blanket under the head.
Pransky uses these cues: “On each exhalation, allow the weight of the lower legs, pelvis, upper back and head to be fully held and supported. On each inhalation, allow the ribs to expand in all directions.”
“This is a great pose for clients who are on their feet a lot,” notes Shaw.

Basic Fish Pose
How: Roll a thin yoga mat from the short side. Place the short end of the mat up against the spine, either at the lower back or behind the back ribs. Be sure to support the head. Stretch out the legs and arms.
“The great thing about practicing backbends restoratively is that they can be targeted to address your specific challenges without overloading any one segment of the spine,” says Carey, who is also the author of the upcoming book, The Yapana Way: Restorative Yoga Therapy & the Art of Being (New World Library, 2015). “They promote better diaphragmatic breathing and feel great for people who are hunched over a computer all day.”
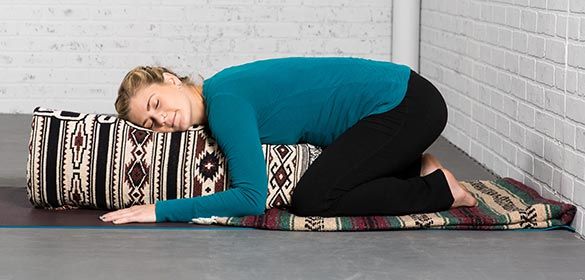
Reclining Twist With Bolster
How: Sit with the right hip close to a bolster’s end. Bend the knees and slide the feet left so the outside of the right leg rests on the floor. Turn right, place the hands on the floor, and lengthen the front-body (front of torso) by gently pressing the hands into the floor. Lower gently onto the bolster and arrange the arms comfortably. The knees should point left while the spine should have a light twist to the right. To increase the twist, turn the head away from the knees. To decrease, rest the forehead on the bolster or turn the head toward the knees. Practice the pose in the opposite direction. Option: Place a folded blanket under the head.
“This pose relieves stress in the back muscles and the sides of the body. It stretches the intercostals and therefore enhances breathing,” says Burgess. Use caution for clients with spondylolistheses, spondylolysis, disc disease or chronic sacroiliac problems, she adds.
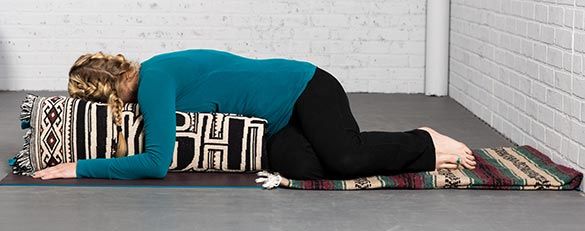
Supported Child's Pose
How: Kneel with the knees hips-distance apart with bolster in front of the body. Pad the shins and knees with blankets as needed. Point the toes directly backward. Position the legs wide enough to rest outside of the side ribs, and slide a bolster between the legs. Bend at the hips to bring the pelvis down to the heel bones while resting the torso on the bolster. Adjust the height of the props to find comfort in the pose. Rest the arms in “goal post” position, and turn the head to one side with the chin slightly toward the chest. Turn the head the opposite way midway through the practice.
Carey notes that the shoulders and hips should be on the same plane, with neither one above or below the other. And if your client has disc disease in his or her lower back or chronic sacroiliac dysfunction, lower the props under the hips and raise the height under the chest and head, cautions Burgess.
“This is the perfect pose to practice after a twist as it settles the back into a neutral position, which is important after rotating the spine,” says Carey.
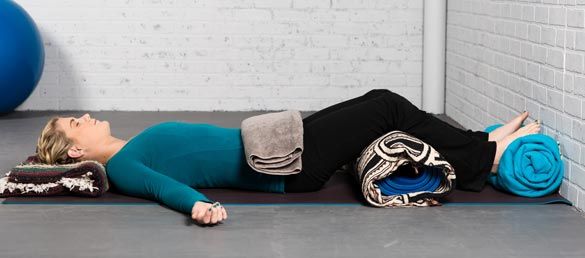
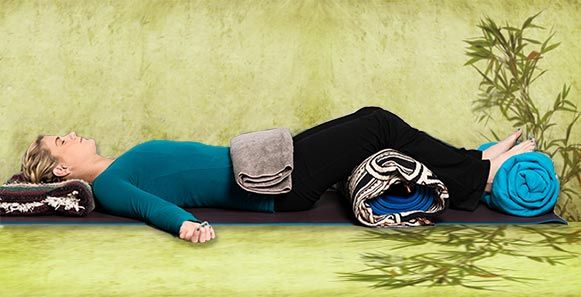
Full Relaxation
How: Roll up a blanket and place it alongside a wall. Lie down with the soles of the feet against the blanket. Place an additional rolled blanket or bolster under the knees to encourage the thighs to rest heavily on the support and release excess tension in the iliopsoas (hip flexors). Place a folded blanket over the belly to encourage the hips to drop further into the ground. Rest arms by the sides, palms facing up or down. Option: Use a small blanket under the head and/or a small rolled towel under the neck for support so the chin is perpendicular to floor.
Pransky uses these cues: “With each exhalation, allow the earth to fully hold each part of the body: heels, thighs, pelvis, upper back and head. Once you feel completely connected to the ground, rest your mind on the waves of your breath.”
Want more? Check out the seminal restorative yoga classic, Relax and Renew: Restful Yoga for Stressful Times, by Judith Hanson Lasater (Rodmell Press, 2011). Or take a fitness profriendly restorative yoga course from YogaFit.


 by
by