When it comes to cardio equipment, treadmills and ellipticals get a lot of play. They’re worthy of attention, but they aren’t the only tools for warming up clients and providing fun, effective cardio. With that in mind, it might be time to revisit (or try for the first time) common cardio machines that you and your clients may have overlooked in the past.
This article, part two of a two-part series, will help you branch out with cardio machines. (Read part one on branching out with strength and conditioning equipment.) Learn important technique tips, and then try these expert-recommended warm-ups and workouts, specifically designed for three worthwhile cardio machines: indoor rowing machine, indoor cycling bike and curved manual treadmill.
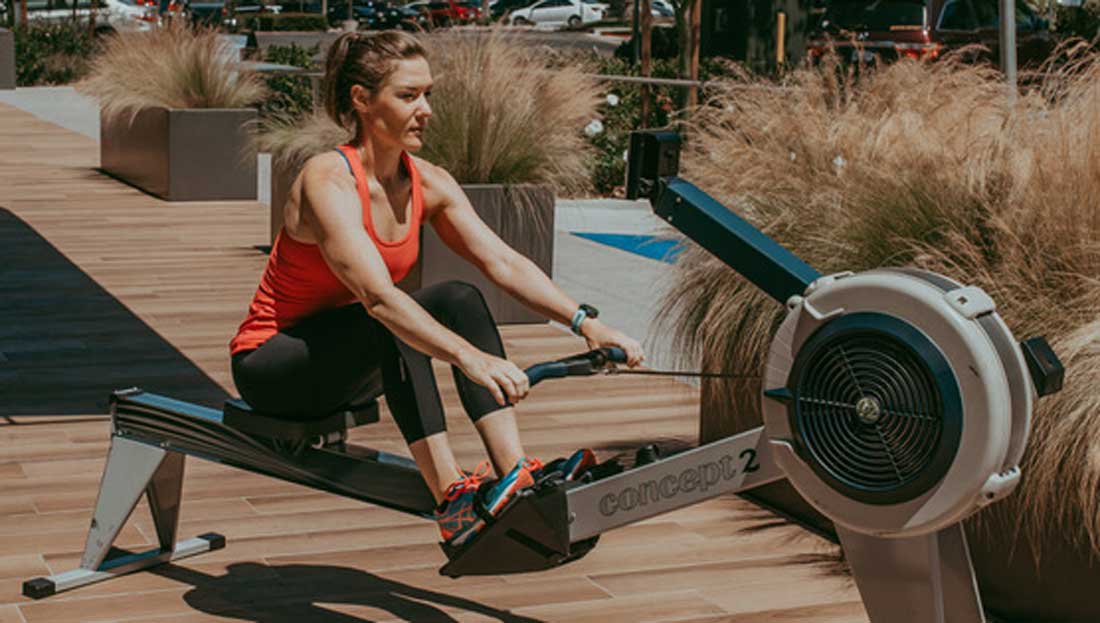
Indoor Rowing Machine
Expert Trainer: Josh Crosby, World Champion rower, co-creator of IndoRow and ShockWave, and key rowing advisor to Orangetheory Fitness
Getting Acquainted: When it comes to machine-based cardio, indoor rowers are worth serious consideration because they are so time-efficient. Crosby says you can recruit nine major muscle groups and more than 80% of the body’s muscle mass with every stroke. Also, these machines are a great option for clients who can’t handle a lot of impact but still want intensity.
“Rowing is very low-impact on your joints,” says Crosby, who provides rowing video tutorials and workshops at joshcrosbyfitness.com. “And as you work out, you’re increasing flexibility in the knees, hips and shoulders.”
Important Technique Tip: For clients to get the most out of a rowing workout, you’ll want to ensure they perform the order of the stroke correctly.
“Think of rowing as a pushing sport, not a pulling sport,” says Crosby.
A common technique mistake is to simultaneously push with the legs and lean back, which is inefficient and strains the low back. Instead, Crosby advises the following order: “Push first with your legs, then lean back with your core/back and, finally, pull in with your arms at the very end.”
On the stroke’s return phase, do everything in the exact opposite order: “Extend the arms first, then hinge forward with the core, bringing your shoulders in front of your hips. Finally, once the handle is past the knees, bring the legs up slowly to take another stroke,” says Crosby. It should take twice as long to come forward as it does to push, lean and pull back. “If you don’t take your time coming forward to rest and recover, you’ll burn out,” cautions Crosby.
Warm-up: This warm-up prepares the client for a workout that Crosby calls Negative Split Row, which uses a predetermined split time as the client’s benchmark.
“A split time is the average time it takes you to row 500 meters,” says Crosby. Most rowing machines calculate average split for you and display it on the monitor. The lower the split number, the more power you’re generating and the faster the split time. The longer you can hold a lower split time, the better the cardiovascular and muscular-endurance effort.
Split-time Warm-up (total time: approximately 7 minutes)
Begin by rowing at an easy intensity for three minutes.
After three minutes, begin performing pause drills. “Take your time coming up the slide, then stop with your arms and core/shoulders forward of the hips,” says Crosby. Hold that position for 1 to 2 seconds. “This drill helps establish the proper arm extension and forward hip-hinge needed prior to the legs coming up,” says Crosby. Keep doing pause drills 15 to 20 times.
After pause drills, row for two minutes at a medium intensity. For most clients, this would be about 24 to 26 strokes per minute (spm), but most importantly, the intensity throughout these two minutes should feel challenging but do-able.
Once you’ve established a medium-intensity pace, mark the average split. To do this, take note of the average time it takes to row 500 meters. For example, if you primarily saw 1:58 to 2:02 splits at medium intensity, the benchmark would be 2:00. This value will act as a benchmark during the workout to come.
Rest for two minutes before moving on to the workout below.
Workout: “The goal of this workout is to lower your split time at each intensity and timing shift,” explains Crosby. If your split starts to rise (i.e., gets slower than what’s expected), sit-up taller, push harder with the legs and refocus on maintaining a consistent pace.
Negative Split Row Workout: (total time: approximately 16 minutes)
First 8 minutes:
Row for two minutes at the benchmark split time. Maintain 24 spm.
Row for the next two minutes at a speed that’s five seconds faster than the benchmark time. For example, if the benchmark split is 2:00, row at 1:55. Maintain 26 spm.
Row for the final two minutes at a speed that’s eight seconds faster than the benchmark time. For example, if the benchmark split is 2:00, row at 1:52. Maintain 28 spm.
Recover for two minutes.
Next 6 minutes:
Row for two minutes at a speed that’s five seconds faster than the benchmark time. Maintain 26 spm.
Row for the next two minutes at a speed that’s eight seconds faster than the benchmark time. Maintain 28 spm.
Recover for two minutes.
Final 2 minutes (plus cool-down):
Row for two minutes at a speed that’s 10 to 12 seconds faster than the benchmark time. Maintain 30 to 32 spm.
Cool down for three to five minutes at an easy intensity.
Indoor Cycling Bike
Expert Trainer: Krista Popowych, 2014 IDEA Fitness Instructor of the Year, Keiser indoor cycling master trainer and Global Director of Group Education at Keiser
Getting Acquainted: Trainers who don’t teach group cycling and have never attended a class might think putting a client on an indoor cycling bike is about the same as using a stationary bike on the gym floor. Not so. The “feel” is different, partly because an indoor cycling bike has a flywheel.
“The flywheel is designed to help make the ride feel more authentic to how outdoor riding would feel,” explains Popowych. Applying resistance against the flywheel mimics the feeling of pedaling at a high gear, climbing a hill or riding against the wind.
Important Technique Tip: While there’s usually only one way to ride a stationary bike, you have more options on an indoor cycling bike.
“An indoor cycling bike has a more curved and streamlined handlebar design, allowing you to ride with various grips and body positions,” says Popowych. For example, you can pedal in an upright position or get down low in an aerodynamic position. You can stay seated or lift yourself off the seat (i.e., saddle) to vary riding posture.
“Always cue to add resistance (gears) first before lifting out of the saddle,” says Popowych. “Riding in this position without enough resistance is actually more difficult because clients have to pedal faster to keep up and out of the saddle.”
Warm-up: The warm-up is a good time to practice proper pedaling technique.
“Avoid just pushing down (mashing) on the pedals,” says Popowych. “Think of pedaling in full circles with both legs and focus on the upstroke as well.”
Cue clients to balance effort throughout the pedal stroke. Start at an easy pace then gradually increase both cadence (i.e., pedaling speed) and gear (i.e., resistance). Most indoor cycling bikes are equipped with digital consoles that display cadence as revolutions per minute (rpm) and resistance as a numerical gear.
Flat Road Warm-up (total time: approximately 7 minutes)
If the bike has a gear adjustment, set the gear between 5 and 10, which corresponds to a rating of perceived exertion (RPE) that is easy to moderate intensity.
Pedal at a cadence between 80 and 90 rpm for two minutes.
Perform 30-second “pick-ups,” three to four times. To do a pick-up, increase the cadence for 30 seconds without changing the bike’s resistance. Then recover at the original pace for another 30 seconds.
Workout: Clients remain seated throughout the following workout drill. Since the bike’s saddle is narrower than most stationary bikes, seated riding can affect comfort level if the seat is set too high or the client is positioned incorrectly. Adjust accordingly.
“For greater comfort, tell clients to shift their glutes back so the sit bones align with the widest part of the saddle,” says Popowych. “If they are too far forward, the seat will press into the soft tissues and cause discomfort.”
Chaos Drill (total time: approximately 6 minutes)
First 10 to 15 seconds: Ride at 80 rpm; RPE should be somewhat hard.
Next 10 to 15 seconds: Without resting from the previous interval, increase cadence to 90 rpm; RPE should be hard. Adjust the gear upward if needed to achieve a challenging intensity.
Final 10 to 15 seconds: Ride at 100 rpm without resting from the previous interval or lowering the gear; RPE should be very hard.
Recover at an easy pace for 60 seconds.
Repeat the above three cadence segments two to three more times. However, mix up the interval order. For example, during the second round, the order might be 90, 100, 80. In the third round, the order could be 100, 80, 90
Curved Manual Treadmill
Expert Trainer: Derek M. Hansen, owner of SprintCoach.com and Sport and Fitness Performance Consultant for major sports leagues, including the NFL, NBA, MLS and NHL
Getting Acquainted: Although the curved manual treadmill looks somewhat similar to a more ubiquitous motorized treadmill, it operates quite differently due to the curved shape and the fact that it’s non-motorized.
“The motorized treadmill drives you,” says Hansen. “[On a manual machine], you drive the treadmill belt.” Whereas a motorized treadmill belt sets the pace based on the speed you plug into the control panel, a manual treadmill moves when you move, adjusting its speed in real time based on your speed and rhythm. “The runner determines the speed of the belt by not only increasing stride rate and ground forces, but also by moving forward to the front of the treadmill where the curve steepness increases,” says Hansen.
When you decrease your pace, you’ll naturally move back to the middle of the curved deck where you can walk or run more slowly. However, you’ll have to maintain a reasonable pace to prevent being pulled off the back of the treadmill when transitioning from high speeds to lower speeds.
Important Technique Tip: When using a curved manual treadmill—which recruits a greater proportion of posterior chain muscles, such as the glutes and hamstrings, compared to a traditional treadmill—Hansen says to get clients thinking about “knee lift” and “vertical force production” from the limbs as they run.
“Cue ‘up and down’ not ‘forward or back' or ‘push or pull,’ as the client runs,” he says. Emphasizing vertical limb movement provides higher-speed running gait on the treadmill’s front-end curve and a greater transfer to conventional running on solid ground.
Also, “cue the client to get the knees up on the front side of the body and avoid pushing out the back,” says Hansen. For safety and movement efficiency, remind clients to maintain tall posture and look straight ahead as they walk or run. Avoid looking down at the treadmill belt, which promotes forward-rotation of the body, weaker posture and less-efficient stride mechanics.
Warm-up: Use the warm-up to build proprioceptive awareness and familiarize the client with how a curved manual treadmill feels different from a standard treadmill. Begin by having the client walk in the middle of the belt while holding both handlebars and gradually increase the speed. Gauge how the machine reacts to the client’s movements, and vice versa.
Basic Warm-up (total time: approximately 4 minutes)
First minute: Walk in the middle of the treadmill, holding the handrails. The client can remove one or both hands when he or she feels comfortable to do so.
Second minute: Jog on the treadmill, gradually moving the foot-strike toward the curved front half of the belt.
Next two minutes: Speed up for 10 seconds at a time, working on stride and upper-body mechanics. Recover with easy walking or jogging for about 30 to 50 seconds between speed intervals. This helps clients reduce intensity and reorient themselves.
Workout: Curved manual treadmills are especially good for interval training because you don’t need to worry about adjusting speed with a control panel. Furthermore, adds Hansen, “Shorter, higher velocity runs are more productive on manual treadmills for building strength, technique and efficiency.” Take note though: Short sprints can be deceptively fatiguing, so err on the side of longer rest intervals to keep running quality high.
Interval Workout (total time: approximately 15 minutes)
Set 1: Perform a sprint interval for about seven seconds. Walk to recover for 60 to 90 seconds. Repeat interval sequence four to five times total.
Set 2: Run at a moderate to somewhat fast pace for 30 seconds. Walk for 30 seconds. Repeat interval sequence five times total and then walk at a moderate pace for two minutes.
As the client gains familiarity with the manual treadmill and improves running fitness, you can incorporate additional sets into the workout.
Sign up to receive CERTIFIED™
CERTIFIED™ is a free online monthly publication from ACE designed to equip certified fitness professionals and health professionals alike with the knowledge they need to continue growing.
Author
Amanda Vogel
Health and Fitness Expert
Amanda Vogel, MA human kinetics, is a certified fitness instructor and the owner of fitnesswriter.com, a website that teaches fitness pros how to make money writing and blogging about health and fitness. Amanda is a Hootsuite-certified social media consultant for the fitness industry and a presenter at top conferences, including IDEA World and NASM Optima. In addition to blogging at FitnessTestDrive.com about fit tech, workout gear and exercise clothes, she writes for popular magazines, including IDEA Fitness Journal, Best Health and Reader’s Digest. Find her on Instagram at @amandavogelfitness.
CERTIFIED™ is a free online monthly publication from ACE designed to equip certified fitness professionals and health professionals alike with the knowledge they need to continue growing.


 by
by