
The negative effects of prolonged sitting are well documented, and include a reduction in aerobic efficiency, an increase in the risk of high blood pressure or coronary artery disease and an increased risk of type 2 diabetes. If your clients sit for long periods of time, particularly with their arms extended to use a keyboard or grip a steering wheel, they may be also be at risk for a number of musculoskeletal issues. Fortunately, you can help them address these issues through creative exercise programming.
It is important to note that, despite what one might read in popular magazines or online, no clear causation has been established via research between occupational sitting and low-back pain. That said, there are some definite effects of prolonged sitting that will, over the long haul, create imbalances in the muscular system that can be a contributing factor to a client’s back pain.
"The goal of this type of program," explains Sabrena Merrill, M.S., exercise physiologist and ACE Education Content Development Expert, “should be to strengthen the glutes and muscles of the posterior chain and to stretch the front side of the body.” The posterior chain consists of the upper- and lower-back, glutes, hamstrings and calves, though the focus of this article and the workout presented below is on the upper and lower back and the glutes because they are the areas most directly affected by prolonged sitting.
For those who sit for much of the day, the primary areas of tightness on the front side of the body are the hip flexors, abdominal muscles and the anterior chest wall. These muscles all become shortened and will often feel tight, while the posterior chain muscles will often become lengthened by a chronic sitting posture and feel weak.
According to Merrill, the best thing a person who sits for much of the day can do to counter the effects of sitting in a chair is to stand up frequently. “Static, motionless sitting wreaks havoc on the body,” she says, “so clients should be instructed to be more dynamic throughout the day.” Standing with good posture—with the lumbar spine in an appropriate amount of lordosis so that the ligaments and muscles can support the lumbar spine—can do wonders. “Getting up and stimulating the muscles that support the spine through gentle movement is essential for individuals who sit for much of the day,” says Merrill.
An Anatomy Refresher
The shape of the trapezius muscle allows it to perform several distinct actions. If the upper portion contracts, the scapulae are elevated, as in shrugging the shoulders. If the lower portion contracts, depression of the scapulae occurs. When all parts of the trapezius are working together, they tend to pull upward and adduct the scapulae at the same time. The trapezius muscles tend to lengthen and weaken with prolonged sitting, while the muscles of the anterior chest wall and abdominal region will shorten and feel tight.
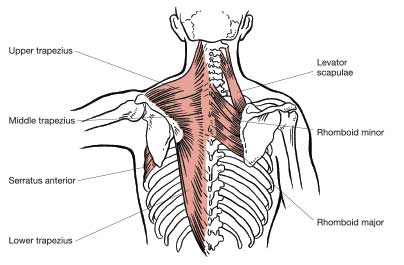
The gluteal muscles serve to give shape to the buttocks and provide a powerful means of movement. Like the trapezius muscles, the glutes tend to lengthen and weaken with prolonged sitting, while the hip flexors on the anterior of the body will become overly tight.
Flexibility Training
Stretching exercises for those clients who are concerned about, or show the ill effects of, prolonged sitting should target these key areas on the anterior of the body: hip flexors, abdominals and the anterior chest wall. In addition, exercises should be included to improve mobility in the muscles of the lumbar and thoracic spine. Here are some sample exercises to consider including in your clients’ stretching regimen.
CAT-CAMEL
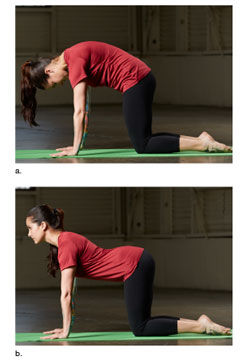
Objective: To improve extensibility within the lumbar extensor muscles
Note: The cat-camel exercise is intended as a motion exercise—not a stretch—so the emphasis is on motion rather than “pushing” at the end ranges of flexion and extension.
Preparation and position:
- Assume the quadruped position with the hands positioned directly under the shoulders (shoulder-width apart) and the knees positioned directly under the hips (shoulder-width apart).
- Engage the core muscles to create a neutral spine in this starting position.
- The elbows should remain extended throughout the exercise.
Exercise:
- From this starting position, exhale slowly while contracting the abdominals [draw the belly button toward the spine (i.e., “hollowing”)], gently pushing and rounding the entire back upward. Drop the head, bringing the chin toward the chest (a).
- Slowly inhale, relax, and return to the starting position, but allow the stomach and spine to sag toward the floor. Allow the shoulders to collapse (adduct) toward the spine, and tilt the head upward (b).
- Perform two to four repetitions.
HIP FLEXOR MOBILITY: LYING HIP FLEXOR STRETCH
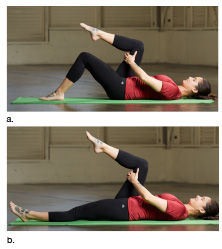
Objective: To improve mobility of the hip flexors in the sagittal plane without compromising lumbar stability
Preparation and position:
- Lie supine with the knees bent and the feet placed flat on the floor, aligning the anterior superior iliac spine (ASIS) with the knee and second toe.
- Engage the core muscles to stabilize the lumbar spine in the neutral position and maintain this position throughout the exercise.
Exercise:
- Reach both hands behind one knee and gently pull the knee toward the chest (a).
- Slowly extend the opposite leg until it is either fully extended or lumbar stability is compromised (b).
- Perform two to four repetitions per side, each for a minimum of 15 seconds.
HIP FLEXOR MOBILITY PROGRESSION: HALF-KNEELING TRIPLANAR STRETCH
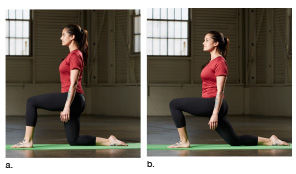
Objective: To improve mobility of the hip flexors in all three planes without compromising lumbar stability
Preparation and position:
- Assume a half-kneeling lunge position, placing the rear leg directly under the hips and torso (a).
- Engage the core muscles to stabilize the lumbar spine in the neutral position. Maintain this position throughout the exercise.
Exercise:
- Exhale and slowly lunge forward to stretch the hip flexors (b). Avoid any forward tilt of the pelvis that increases lordosis in the low back.
- Perform two to four repetitions per side.
- Hold each stretch for a minimum of 15 seconds.
THORACIC SPINE (T-SPINE) MOBILIZATION EXERCISES: SPINAL EXTENSIONS AND SPINAL TWISTS
SPINAL EXTENSIONS
Objective: To promote thoracic extension
Preparation and position:
- Lie supine with the knees bent and feet placed flat on the floor, aligning the anterior superior iliac spine (ASIS) with the knee and second toe.
- Position the arms at the sides with elbows extended.
- Engage the core muscles to stabilize the lumbar spine (avoiding increased lordosis during the exercise) and maintain this contraction throughout the exercise.
- Depress and retract the scapulae while stabilizing the low back (a).
Exercise:
- Exhale and slowly flex the shoulders, raise both arms overhead, and attempt to bring both hands to touch the floor overhead (“I” position) (b). Since the arms tend to internally rotate during shoulder flexion, and shrugging of the shoulders often occurs, attempt to depress the scapulae and keep the arms in a neutral or externally rotated position.
- Slowly return to the starting position.
- Perform one or two sets of five to 10 controlled repetitions, holding the end range of motion for one to two seconds, with 30-second rest intervals between sets.
- Repeat the entire movement from the starting position, but move into a “Y” formation, abducting the arms to 135 degrees (c).
- Repeat the entire movement from the starting position, but move in a “T” formation, sliding the arms along the floor and abducting them to 90 degrees (d).
- Repeat the entire movement from the starting position, but, with the elbows bent, move in a “wiper formation,” sliding the arms along the floor from the sides to an overhead position.
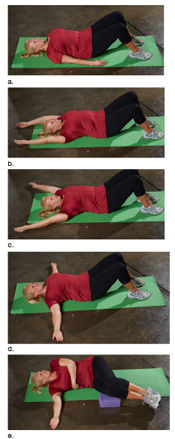
SPINAL TWISTS
Objective: To promote trunk rotation, primarily through the thoracic spine with some lateral hip mobility
Preparation and position:
- Lie on one side, bending both knees to 90 degrees, flexing the hips to 90 to 100 degrees, and aligning both knees together, resting them on a ball or riser. Keep the lower knee on the ball or riser throughout this first exercise progression and keep both knees aligned. Engage the core muscles to stabilize the lumbar spine (avoiding increased lordosis) and maintain this contraction throughout the exercise.
- Reach the upper arm across and in front of the body, grasping the rib cage on the opposite side of the trunk (e).
Exercise:
- Exhale and slowly rotate the torso by pulling on the rib cage. Attempt to avoid any rotational movement of the hips and knees.
- Perform two to four repetitions to each side.
- Hold each pull for 15 to 30 seconds.
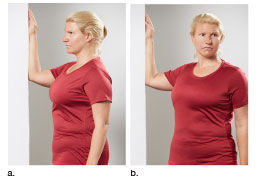
ANTERIOR CAPSULE (PECTORALIS) STRETCH
Exercises to Strengthen the Posterior Chain
Doug Balzarini, ACE Certified Personal Trainer and owner of Iron Village in Beverly, Mass. (www.IronVillageSC.com), recommends the following six exercises for clients seeking to counteract the detrimental effects of occupational sitting. While this is by no means an exhaustive list, Balzarini provides examples of creative exercise programming to strengthen the back that moves beyond rows, pull-ups and lat pull-downs. Of course, those exercises can be featured in a workout targeting musculature of the back, but they neglect some of the smaller, more inactive muscles in that region—particularly the middle and lower trapezius muscles—that Balzarini says are so important for many clients.
For the four upper-body exercises presented here, select light resistance tubing, as these exercises are designed to target the smaller intrinsic muscles of the back (primarily the mid- and lower trapezius muscles). If the resistance is too great, the larger muscles of the upper back will take over the movements.
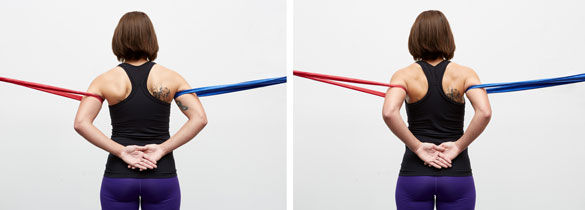
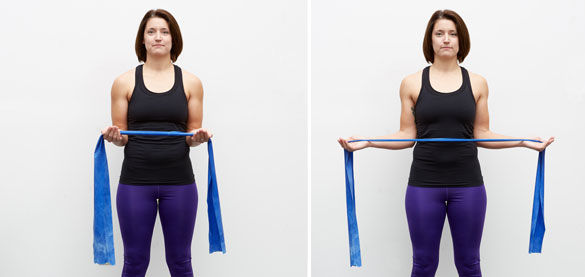
Chicken Wings
- Anchor two pieces of light tubing at shoulder height and put the arms through the tubing as if you are slipping on a shirt.
- The tubing should wrap around the upper arms, just above the biceps and triceps. (starting position photo)
- Place both hands so that they overlap in the middle of the lower back.
- Step backward to create a little tension in the tubing.
- Pull the elbows back as if you are trying to touch your elbows together. (end position photo)
Standing Shoulder External Rotation
- Hold the hands out in front of the body with the palms up and the elbows bent 90 degrees.
- Let the tubing rest lightly in the hands. (starting position photo)
- Externally rotate the shoulders to create tension in the tubing, being sure to keep the elbows in tight to the sides of the body. (end position photo)
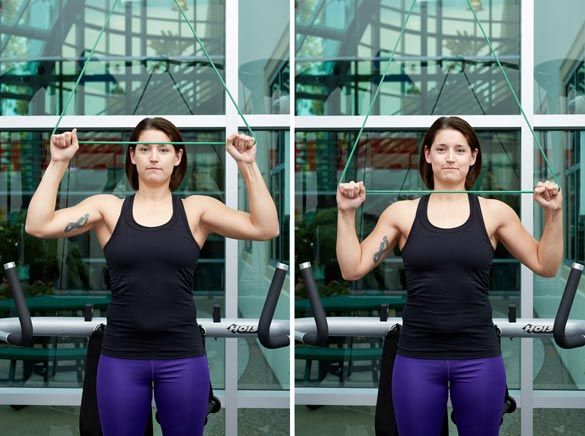
Tubing Ws
- Anchor the tubing above head level to create a downward angle for the movement.
- Stand facing the anchor and hold the tubing at about eye level. (starting position photo)
- Pull the elbows back and down. Note that the arms should form a “W” at the end position. (end position photo)
- There are three key elements to this exercise:
- Keep the elbows down while driving the hands back.
- Keep the wrists over the elbows to achieve better muscle activation.
- Keep the forearms perpendicular to the floor.
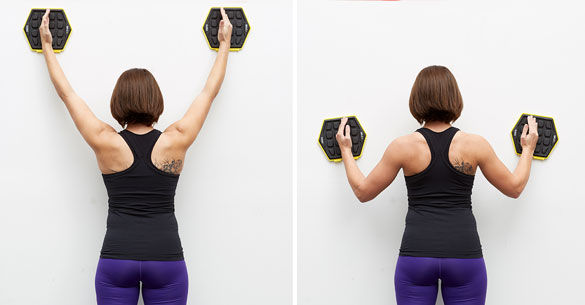
Wall Slides
Note: Sliders are optional in this exercise, but they are helpful in forcing the exerciser to apply gentle pressure in order to hold the sliders against the wall.
- Stand facing the wall, using the edge of the hands to hold the slides with the arms in a Y position. (start position photo)
- Drive the elbows down while pulling the shoulder blades back and down. The exercise ends with the arms in a W position. (end position photo)
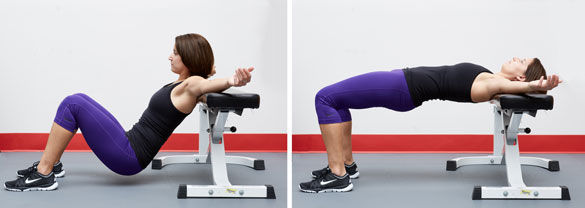
Hip Thrusts
- Sit on the floor facing away from a bench, with the knees bent and feet flat on the floor. Lean back so the upper back is leaning against the bench. (start position photo)
- Drive through the heels and push into a tabletop position. (end position photo)
- Be sure to activate the glutes by squeezing at the end of the range of motion, while trying to reach a position where the body is parallel to the floor.
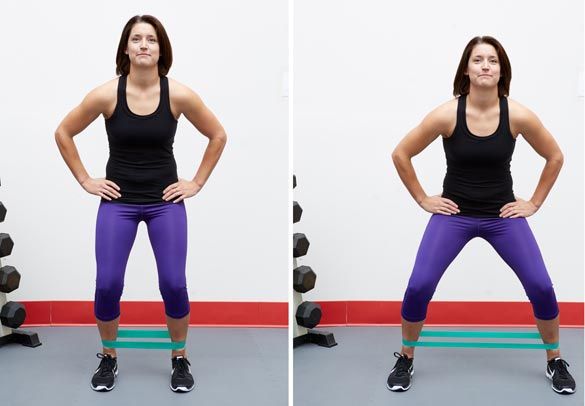
Band Walks
Note: For this exercise, use a smaller band to wrap around the ankles.
- Step into the band as if you are stepping into a pair of pants.
- Stand in an athletic position, with a slight bend in the hips and knees. (start position photo)
- Take lateral steps to create tension in the band. (end position photo)
- Be sure to keep the feet from externally rotating at any point during this exercise. The toes should always point straight ahead.


 by
by 


