When it’s time to transition a client from body-weight exercises to something a bit more challenging, many health and fitness professionals go right for the free weights. This isn’t always the best choice, however. While free weights such as dumbbells, barbells and kettlebells have their place in the fitness world, your clients may not be fully prepared for this jump in intensity.
The ACE Integrated Fitness Training® (ACE IFT®) model indicates that, before adding an external load (such as free weights), it’s important to first challenge clients by improving other measures of fitness—specifically, stability and mobility—and ensure that they have developed proper movement patterns. The stability ball is a great tool for enhancing full-body stability and mobility.
The Workout
The body and its major joints follow a stable/mobile pattern when ascending from feet to head (Figure 1). The following exercises also follow this pattern. The stability ball is used to aid in either the stability or mobility of the joint and/or muscles being worked.


Single-leg Around the World
Focus: Foot stability
Stand on one leg with the ball positioned in front of the body. Use the fingertips to slowly move the ball in a circle around the body, first clockwise and then counter clockwise. Switch legs and repeat. This move challenges the balance of the entire body, which begins in the feet.
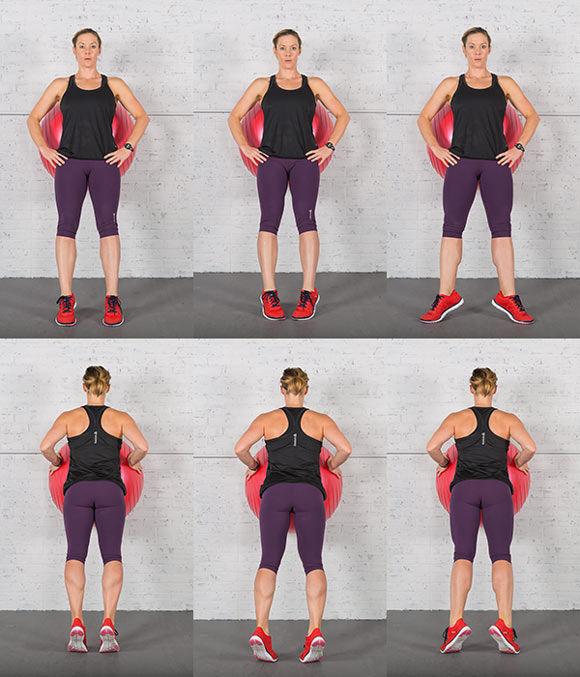
Wall Calf Raises
Focus: Ankle mobility
Using the ball to support the back, lean back against a wall so the body is at a 60- to 75-degree angle. Complete three calf raises: with toes pointed forward, with toes turned inward slightly, and with heels in and toes turned outward. Then turn around and complete the same calf raises with the belly on the ball. The multiple angles achieved by changing the position of the feet and then facing the wall, forces the ankle into mobility from a variety of directions. Facing the wall also allows for the muscles of the lower leg (gastrocnemius and perineals) to be stretched on the downward part of the movement.
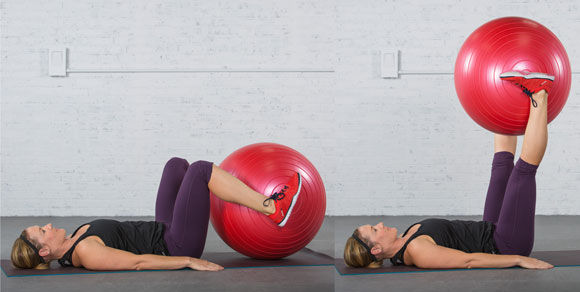
Supine Leg Extensions
Focus: Knee stability
Lying face up on the floor, squeeze the stability ball between both ankles with legs extended at 90 degrees above the hips. Keep the knees in line over the hips and bend and extend the knees while squeezing the ankles together, maintaining the position of the stability ball between the feet. Using the quadriceps as well as the adductors, both of which attach around the knee and hip joints, will strengthen the knee and provide stability to this hinge joint without additional impact on the joint and its structures.
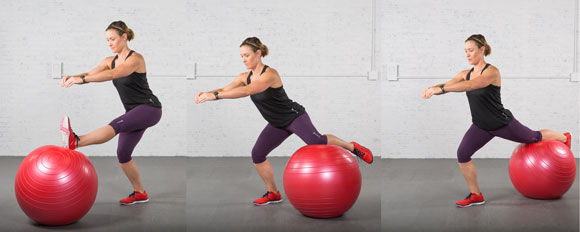
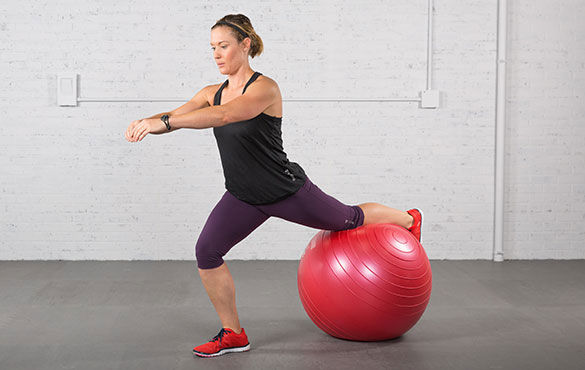
3-way Single-leg Squat
Focus: Hip mobility
Extend one leg out in front of the body and place the ball under that foot, elevating it off the ground. On the standing leg, sit down and back slightly until a stretch is felt in the hamstring of the leg on top of the ball. Next, while standing on the same leg, move the ball to the side of the body and rest the inside of the knee on top of the ball. Perform a small squat on the standing leg, allowing the ball to roll sideways from the body, until a stretch is felt in the adductors. Return to standing and turn so the ball is under the same leg, but the knee and ball are behind the body. Perform a small squat again, until a stretch is felt in the hip flexor of the leg that is on top of the ball. Repeat all three movements with the opposite leg on top of the ball. With the ball supporting the leg in all three directions of this movement, the muscles of the leg and hip are relaxed and mobility is enhanced. By moving through all three directions, the hip joints on both sides are forced to move through multiple planes, which creates mobility in the elevated leg and improved hip stability in the standing leg.
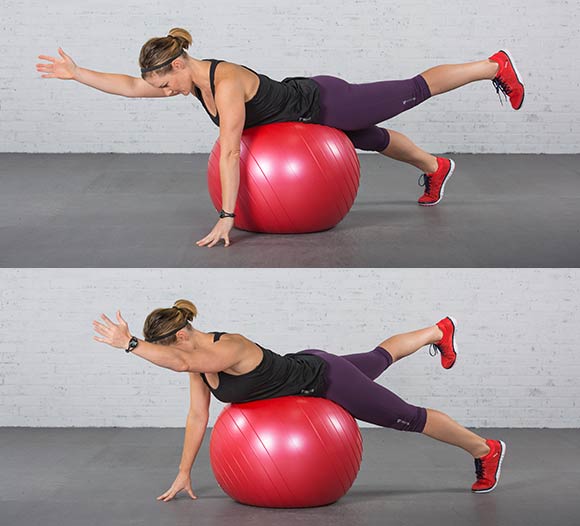
Supported Bird Dog
Focus: Lumbar spine stability
Position the ball under the hips and begin with the toes and fingertips in contact with the floor. Maintain this position of the ball and slowly lift one foot and the opposite hand off the ground. Reach the hand and foot away from the center of the body, creating a straight line parallel to the floor before lowering back down. Switch sides. By engaging the posterior chain and lifting the arm and leg, the muscles of the trunk, particularly around the lumbar spine are engaged and are forced into creating a stable environment on top of an unstable surface.
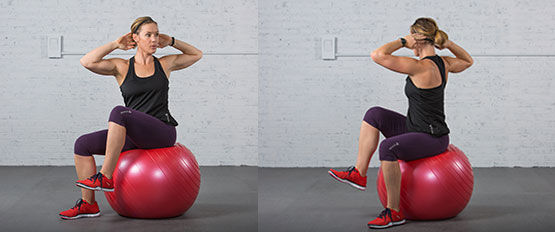
Seated Crunch With Twist
Focus: Thoracic spine mobility
Sit on top of the ball with the knees are bent at 90 degrees. Place the hands behind the head and maintain an erect spine. Bring one knee up and rotate the upper body, moving the opposite elbow across toward the knee. It is important to not flex the spine forward; rather, rotate as far as possible and keep the chest tall. Return to the starting position and repeat on the other side. This move challenges the rectus abdominis and, by rotating the shoulders, mobility in the thoriacic spine is enhanced while the lumbar spine stays stationary to balance on the ball.
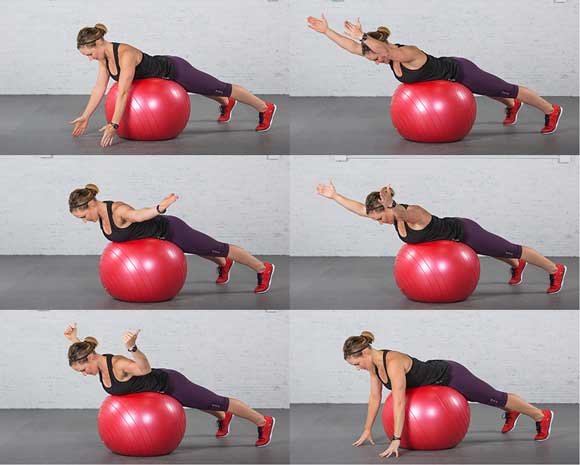
Prone I, T, Y, W
Focus: Scapulothoracic stability
With the stability ball under the hips, leave the toes on the ground and lift the upper body until a straight line is formed from head to feet. Engage the legs, glutes and back while pulling the shoulder blades downward. Begin with the arms extended below the chest, fingertips on the ground, palms facing inward. Lock the shoulder blades into place and raise the arms upward, forming each of the following letters: I, T, Y, W. The neck should stay long and the upper trapezius muscles relaxed. Performing these isolated movements with the shoulder blades “packed” helps to build stability in the scapulothoracic joint and increase overall trunk strength.

Child’s Pose With Reach
Focus: Glenohumeral mobility
Kneel behind the ball and, with arms outstretched, place both hands flat on top of the ball. While sitting the hips back toward the feet, stretch the arms forward, moving the ball away from the body. Return to a kneeling position and bring the palms off the ball, pointing the thumbs upward. Repeat the movement. Return again to kneeling and flip the palms again so the backs of the hands are flat on the ball. Repeat the movement. For the last rep, flip the hands yet again so the backs of the hands face each other and thumbs are down toward the ball. By changing the position of the hands each time, the hips sit back, all aspects of the rotator cuff are reached and mobility can increase over the entire joint rather than in a single plane of motion.


 by
by