


 by
by Hip mobility and strength is essential for many daily activities like bending down to pick up an object or young child from the ground, walking up stairs or simply getting up from a seated position. In addition to providing an appealing shape, the glutes play an essential role in optimizing human performance for athletes, dancers and other people who move for a living. The primary role of the hip extensors, which include the hamstring and adductor muscles of the thigh, is to extend the hip during gait (walking or running) and provide dynamic stability when on a single leg. The hip extensors are responsible for lower-body strength and for distributing power from the ground through the rest of the body. It’s important to note that a lack of proper hip strength could lead to a sore low back, so doing exercises for your glutes will not only help improve the way you look, it can also help reduce your risk of back injury.
While the squat is an excellent exercise for enhancing both athletic performance and aesthetic appearance, when done incorrectly, it can cause discomfort in the low back and possibly injure the knee. If you are interested in strengthening your hips and developing an appealing backside, but want to reduce your risk of injury, try these six lower-body exercises that can help you achieve the results you want.
1. Glute Bridge
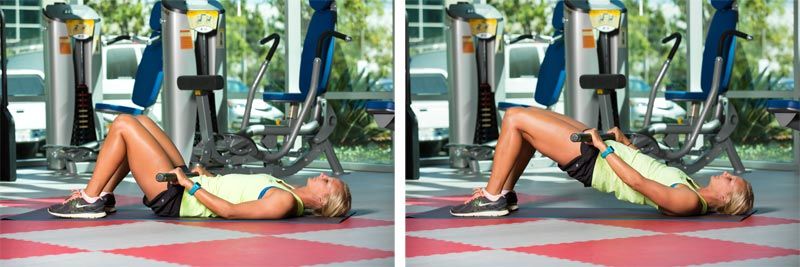
Performed on either a floor or bench, glute bridges use the hip extensor muscles in a position that is safe for both the back and knees. To increase the level of difficulty, place a weight across the bony part of the hips (the ASIS of the pelvis). For best results, focus on pushing your heels into the floor and lifting your hips up to the ceiling while keeping your low back stable. D two to three sets for 12 to 15 reps (or until fatigue), resting for 45 seconds between sets.
2. Hip Hinge
(also known as a Romanian Deadlift)
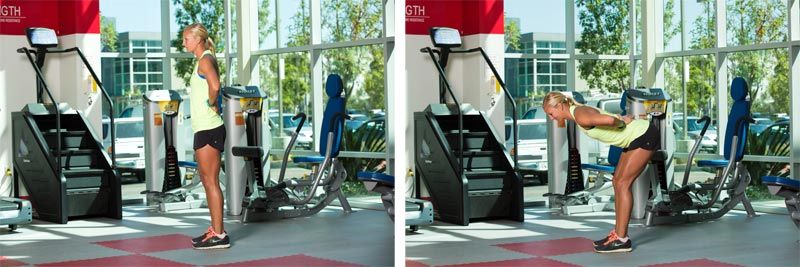
This is a safe lower-body exercise that focuses on the glutes, hamstrings and, adductors, making it great not only for your rear end but also your upper and inner thighs. During this movement, your lumbar spine (low back) should remain stable and stiff and the movement should come directly from your hips. When learning this exercise, place your hand on your low back as a reminder to NOT let it bend. Start by maintaining a stable spine and your knees slightly bent. Lean forward by pushing your rear end toward the wall behind you until you feel tightness in the back of your legs (do not let your back bend). Return to the starting position by pushing your feet into the floor and your hips forward. Learn to do this movement with your body weight first before adding resistance.
3. Step-ups
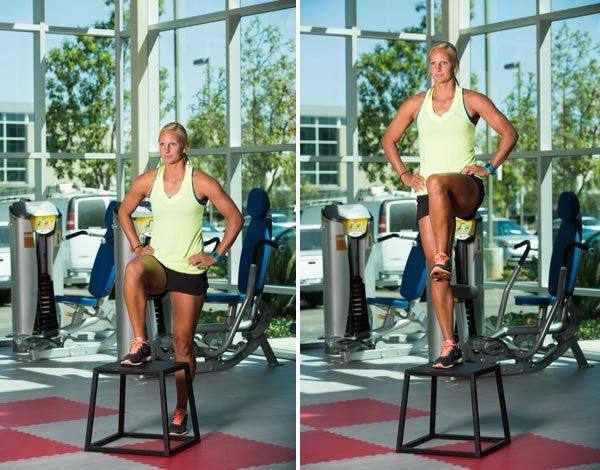
Walking or running up stairs or simply doing step-ups on a box is a great way to use all of the muscles responsible for extending and creating dynamic stability of the hips during upright movements. Use a box that is the same height or slightly lower than your knees. Place your right foot up on the step and push your foot into the box to step up. When you reach the top, lift your left knee into the air (this creates additional movement of the right hip, which is essential for using the entire muscle), lower the left leg and repeat all the reps on one side before switching legs. Do 10 to 12 reps on one leg before switching to the other leg; repeat for two to four sets. To increase intensity and build muscle more quickly, hold dumbbells in your hands.
4. Rear Lunges
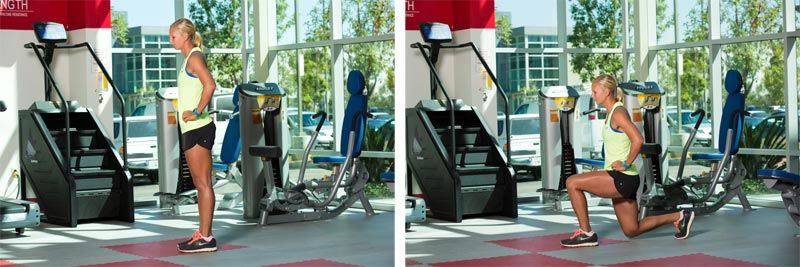
Squatting or lunging can be painful to the knee joint, particularly when the knee bends more than the hip or ankle during the movement. Stepping backwards removes the risk of too much forward motion from the knee by transferring most of the movement into the hip. Start with both feet hip-width apart. Step back with your right foot and slowly lower your right knee toward the ground while leaning forward slightly (maintain a stable spine during this forward lean). Return to standing by pressing your left foot into the ground and pulling yourself back to standing with your left leg. (For extra emphasis on the inner thigh muscles, think about sliding your left knee back.) Perform 10 to 12 reps on one leg before switching to the other leg; perform two to three sets with 30 to 45 seconds of rest between sets. To increase the level of difficulty, hold dumbbells in your hands or a medicine ball in front of your chest.
5. Lateral Lunges
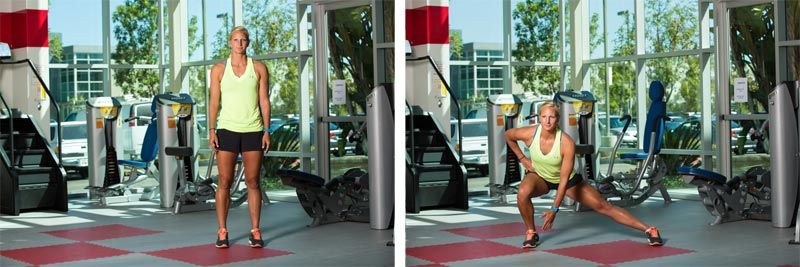
The benefit of doing lateral or side lunges is that you not only use your hip extensors, you also involve the quadriceps muscles, which help to create shape for your outer thigh. Start with both feet parallel. Step directly to your right while keeping your left foot pressed into the ground. As your right foot hits the ground, push your right hip back toward the wall behind you while reaching for your right foot with your left hand. (This reaching motion increases the range of motion in your hip, placing extra emphasis on your glutes.) Return to standing by pushing your right foot into the ground and pulling with the inner thigh muscles of your left leg. Complete 10 to 12 reps on one leg before switching legs; perform two to four set with 30 to 45 seconds of rest between sets. To increase the intensity, hold one dumbbell (vertically) or a medicine ball in front of your chest.
6. Kettlebell Swing
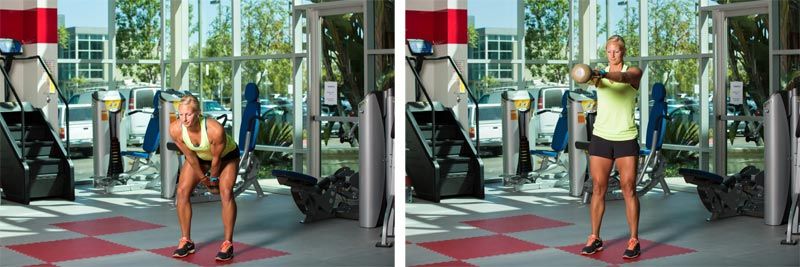
WARNING: This exercise may cause rapid development of your glutes, but is often done incorrectly. First, DO NOT attempt this exercise until you master the hip hinge. Once you can do two to four sets of 10 to 12 hip hinges without discomfort, you are ready to progress to the kettlebell swing. When done correctly this exercise is a dynamic version of the hip hinge (which is why mastering that movement is critical before learning this one). With your feet hip-width apart, start with the kettebell between your legs with your knees slightly bent. Lean forward by pushing your hips back (DO NOT ALLOW YOUR BACK OR KNEES TO BEND) to move the kettlebell slightly behind you. Explosively push your feet into the floor and your hips forward to move the kettlebell in front of the body. (Hold on to the weight with your hands, but avoid the urge to use your shoulders—the movement comes from the hips, not your upper body.) Allow the kettlebell to fall back between your legs while hinging forward to decelerate the movement. R for eight to 12 reps without letting your back bend or knees squat down.
If you want a lower body-focused workout to address your backside without having to do squats, select three of these exercises and, after a good warm-up, perform three to four sets of 10 to 12 reps for each exercise, resting approximately 30 to 45 seconds between sets. For best results do all reps on one leg before switching to the other leg. If you look closely, only one of these exercises requires the use of equipment, which means these are excellent options for when you can’t make it to the gym or simply prefer to work out at home. A great side benefit of focusing on your lower body is that you can quickly increase your lean muscle mass, which elevates your resting metabolism and increases the number of calories you burn outside of your workouts.
You can train your lower body almost everyday by doing strength training with weights one day and cardiovascular training the next. However if your goal is to develop optimal size and definition, you should allow at least 24 hours of rest after a good strength-training workout. For example, you can make a three-day split of lower-body exercises on day one, upper-body exercises on day two and cardio training on day three (make sure to take at least one complete rest day per week to allow for optimal recovery).


 by
by