 by
by Many people try to reverse the effects of aging or keep it at bay by eating a healthy diet, exercising and practicing self-care. The laws of nature, however, have different plans for aging bodies.
Joints, in particular, can become sources of pain and immobility. As we age, joints become less flexible and more brittle. Cartilage can rub away and calcification can occur, especially in the shoulders, which can bring on bone spurs.
Degenerative diseases such as osteoarthritis can be very painful and lead to a greater loss in mobility and overall health.
The spine is comprised of many vertebral joints, and spinal disc compression can be the source of back pain for many people. However, improving posture through a yoga practice can help keep the spine healthy and mobile. In fact, yoga is a great way to alleviate the stiffness and pain associated with joint aging and arthritis. Gentle, mindful movement aids in relaxation responses in the body and can be an effective way to reach deep into the crevices and corners of the joints.
Ellen Saltonstall, a yoga teacher with osteoarthritis in her hands, one foot and lower back, attributes her daily 60- to 90-minute yoga practice to keeping her agile. “I find that a daily practice helps the most. When I skip a few days, I feel like I’ve aged 10 years,” she told Yoga Journal in 2009.
The research appears to agree with her. A 2015 study published in the Journal of Rheumatology found that practicing yoga increased the mood and physical health among sedentary adults with waning joint health. Practiced three times per week, yoga improved their pain and energy levels as well.
Finding the Right Yoga
Of course, not all yoga classes are designed to be easy on aging joints. More intense styles of yoga, such as Ashtanga and vinyasa, are not built for beginners or those with aging joints. Instead, urge your clients to try beginner, gentle or hatha yoga classes. Yin yoga, which incorporates long holds of poses, often supported by props, can help build musculature around the joints that will help increase support for those joints. Urge your clients to talk to the instructor before class to explain their condition and ask for modifications if any pose is painful. Always encourage clients to consult with a doctor before taking on a new movement activity.
Three Poses to Ease Joint Pain
These three poses are generally safe for most individuals and can help ease joint pain:
Kneeling Lunge (for knees, ankles and hips)
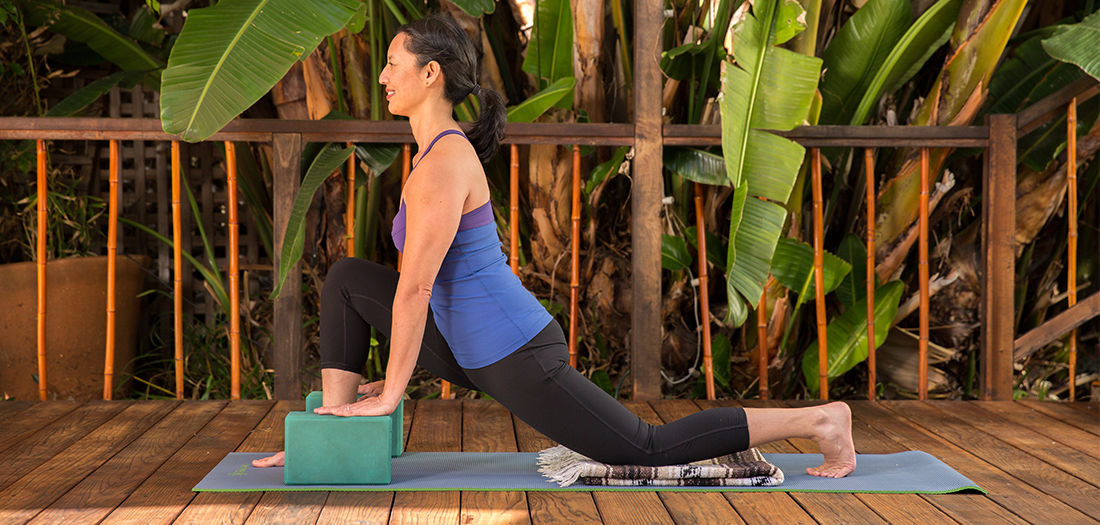
Lunges help to build muscles in the legs that support the knee joint. Kneeling in the lunge provides an opportunity to get deep into the hips, building stability around the outer hip. The pose also requires balance, so it builds strength in the smaller muscles supporting the feet and ankles.
Begin on hands and knees and step the left foot between the hands. Make sure the knee is stacked above the ankle and the foot is pointed straight ahead. Bring blocks underneath the hands and lengthen the spine. If there is any discomfort in the back knee, place a folded blanket or towel underneath or double up the yoga mat. Inhale and lengthen the spine, lifting from the crown of the head and extending through the chest. Exhale and sink the hips toward the floor. Continue to breathe using this pattern of extension and deepening for at least 10 breaths. Repeat on the other side.
Seated Twist (for hips, spine and shoulders)
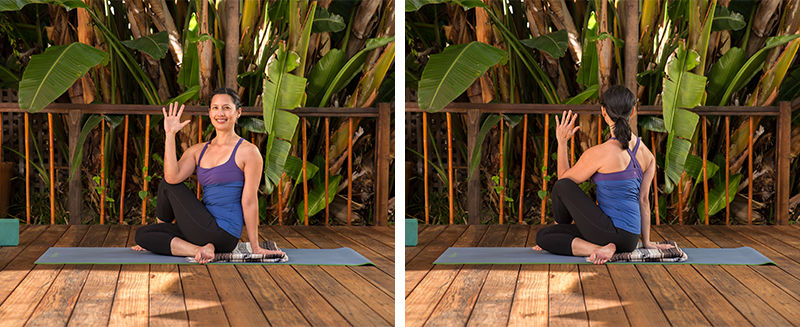
All twists are beneficial for spinal health. This one incorporates stretching and strengthening for the shoulders, upper back and hips.
From a comfortable seat, extend both legs straight in front of you and draw the fleshy part of the buttocks away to sit evenly on the sits bones. Bring the left leg across the right so the left foot is planted firmly on the outside of the right thigh and the left knee is in the air. Stay even on both sits bones. Bend the right leg so the right heel comes outside the left hip. If this creates an uneven stance in the hips, re-extend the right leg. Inhale and lengthen the spine, as if lifting up out of the hips. Exhale and twist to the left, keeping the hips even and the spine long. The left arm can come to rest behind the left hip, and the right arm can come on the inside of the right knee or anywhere that feels safe and comfortable. Continue to breathe deeply, following the pattern of extension on the inhale and gently continuing the twist to the right on the exhale. Continue for at least 10 breaths, engage the core to come back to center and switch sides.
Dolphin Pose (for the shoulders and spine)
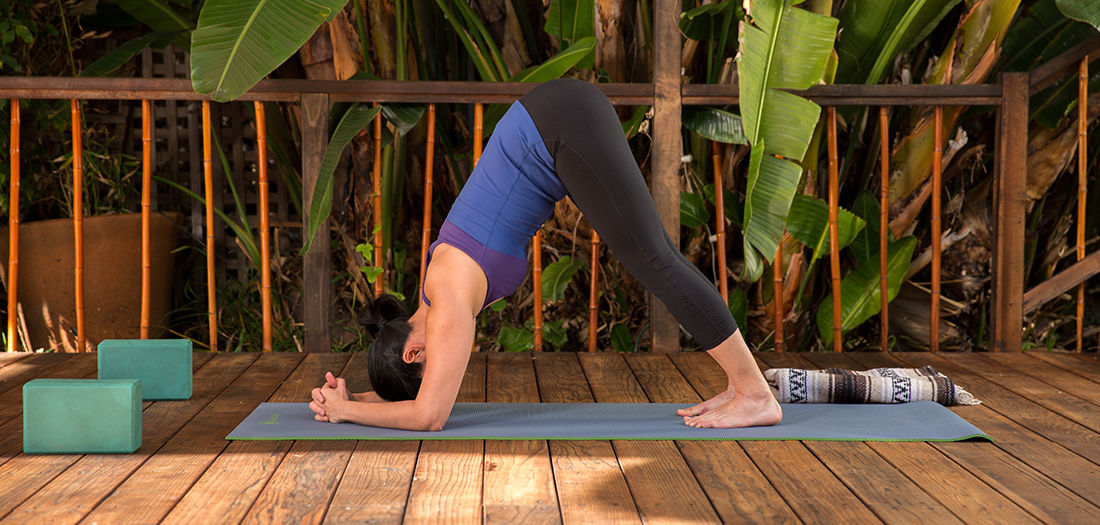
Dolphin pose is great for building strength in the shoulder girdle, which is key to supporting the complex structure of the shoulder joint. It can be challenging to hold this pose for a long time at first, but as your client builds strength and flexibility in the shoulders, it will start to feel easier. It is also a slight inversion, which releases tension in the spine.
From hands and knees, come onto the forearms and clasp the hands together. Tuck the toes and lift the hips to come into an inverted “V” shape—just like downward facing dog, but on the forearms. Keep the head off the floor and look to the middle of the mat. Pause here and breathe, focusing on pressing the forearms into the floor, relaxing the neck, keeping the back long, hips elevated, core engaged and heels reaching toward the floor.
Expand Your Knowledge
ACE offers a self-study opportunity to learn more about building and maintaining healthy joints. Check out Your Clients FrameWork—7 Steps to Healthy Muscles, Bones and Joints.


 by
by