


 by
by Sun salutation or surya namaskar is one of the most commonly performed yoga series. It is a set of postures linked together to salute or honor the sun, which sustains life on earth. These poses enhance posture, strength, mobility and focus. Regardless of experience, the essence of yoga is about being fully present in the moment and letting go of expectations regarding what should happen on the mat or in life. With that said, it’s O.K. to let go of the notion that your sun salutation has to look a certain way. The full expression of the series may feel uncomfortable, or you might get more benefit from altering it. The following options are offered as alternatives to suit your individual needs. Pick the postures that work for you and move toward practicing this series with confidence.
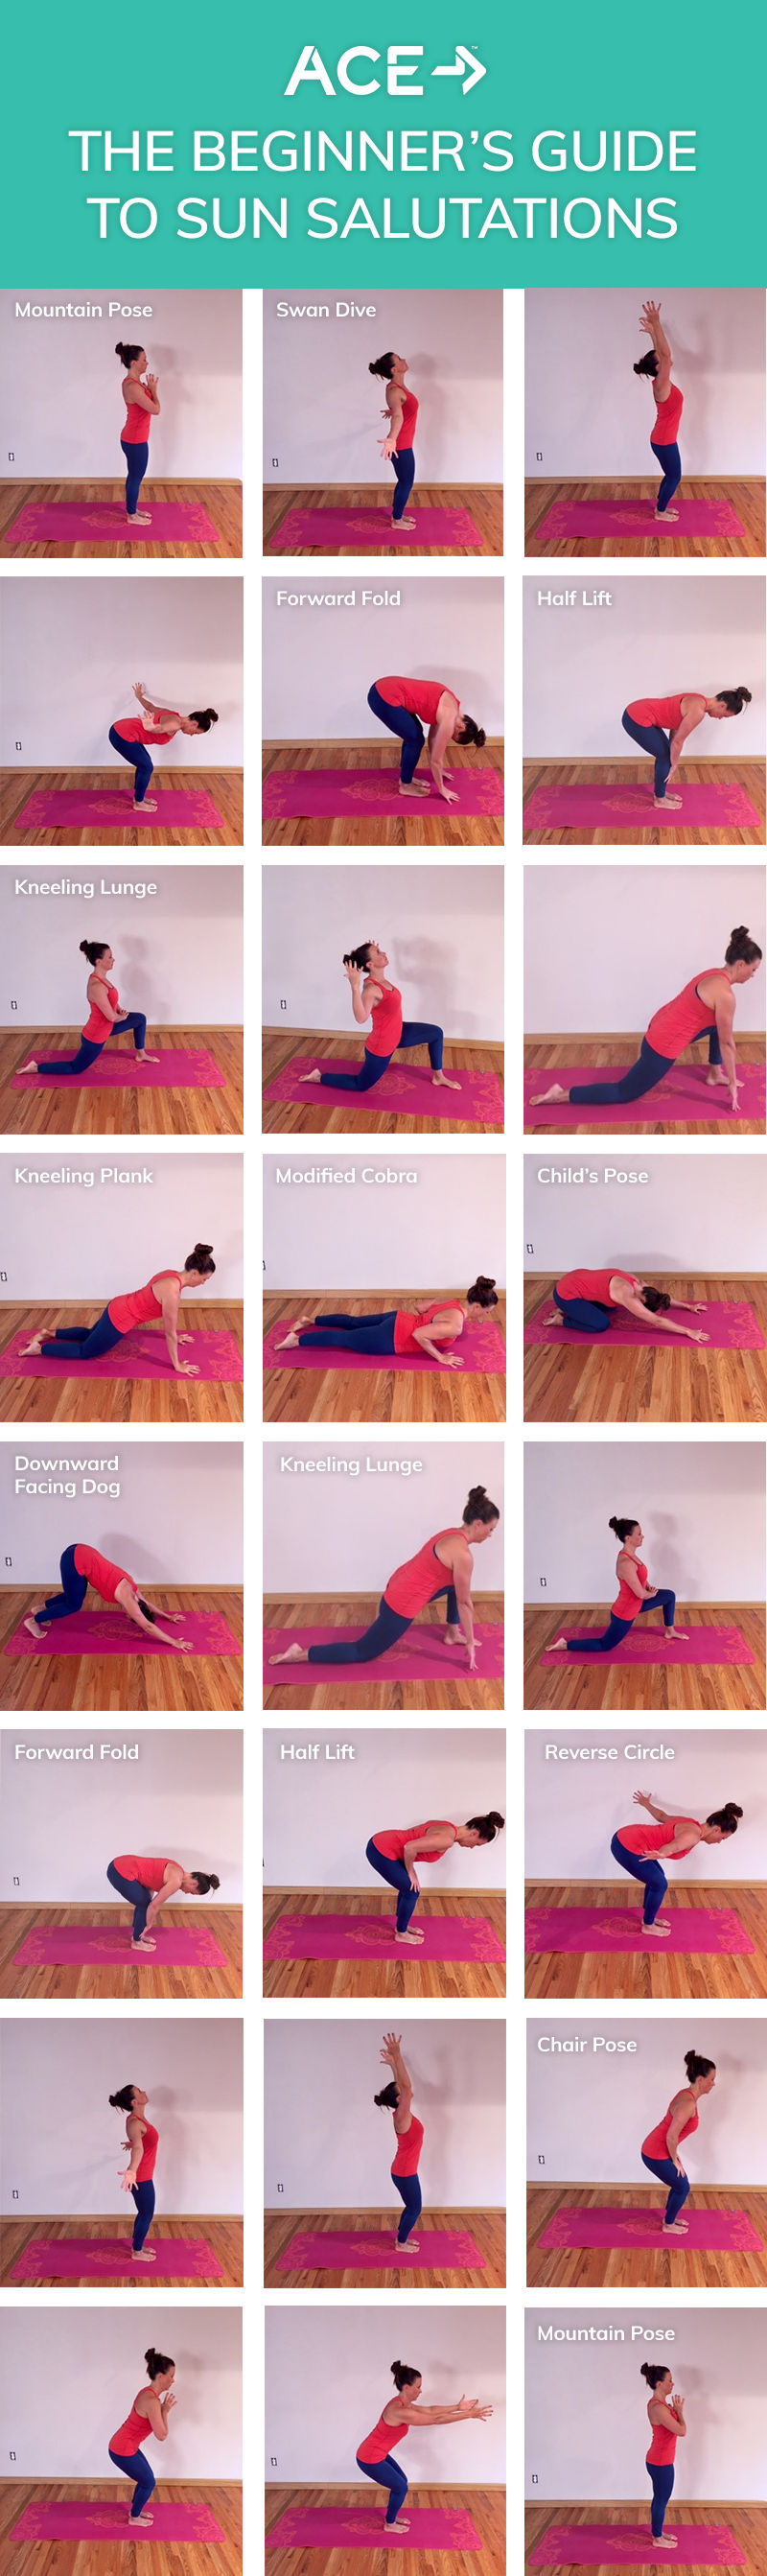
Sun Salutation A: Beginner Options
Mountain
- Stand with feet touching or shoulder-width apart; ground into the earth with all four corners of the feet.
- Stand tall, lengthening through the spine.
- Place the palms together in prayer position and keep the shoulders relaxed.
Swan Dive - this variation assists in maintaining spinal alignment, reduces pressure on the lumbar spine and opens the chest.
- Bend the knees softly, sweep the arms overhead, look up to the thumbs and reach to the sun.
- Remain in strong mountain alignment.
- Swan dive to the floor, leading with the chest, hinging at the hips and pressing the hands toward the sides in a long lever.
Forward Fold, bent knee
- Bend the knees a lot to relieve pressure on the low back.
- The low belly should touch or almost touch the upper thigh.
- Extend the arms and hands toward the toes or shins.
- Relax the head, neck and shoulders.
- Optional half lift
- Place hands on the shins or thighs.
- Brace the belly and extend the spine so the back is flat.
- Tuck the chin toward the chest and lengthen the back of the neck.
- Gaze to the mat.
Kneeling Lunge
- Step back into a lunge with the knee off the floor or a kneeling lunge with the knee resting on the floor.
- Make sure the front knee is over the ankle and the front heel is flat on the floor.
- Place hands on the mat or the top of the thigh, or extend the arms in field goal position or overhead.
- Press the pelvis slightly forward to feel a stretch in the hip flexor.
- Keep the shoulders relaxed away from the ears while lifting the chest forward and up.
Kneeling plank + kneeling chaturunga
- Step back to kneeling plank position.
- Brace the belly and stabilize the shoulders. Engage the glutes lightly and press the thighs together.
- Align the shoulders, hips and knees in a straight line.
- Tuck the chin and lengthen through the crown of head and tailbone.
- Kneeling chatarunga
- While maintaining plank alignment or lifting the hips slightly, brace the belly and slowly lower the body to the floor.
- Keep the elbows tucked tightly to your sides.
- Spread the fingertips wide on the mat.
- If this is painful, choose child’s pose instead.
Modified cobra or sphinx
- Keep the elbows on the floor or place the palms flat on the floor.
- Brace the belly, relax the glutes and press up slowly.
- Extend the spine, lengthening through the crown of the head.
- Keep the chin tucked slightly and the neck aligned with the spine.
- Keep the hips on the floor.
- Extend only as far as you are comfortable—think length, not height.
- As you get stronger, begin to lift a bit higher to full cobra and/or up dog as demonstrated by instructor.
Child's pose or downward facing dog
- Press up into kneeling plank.
- Drop back to child’s pose or skip right to down dog.
- Down dog
- Tuck the toes under and spread the fingers wide on the mat and into the floor.
- Lift the hips to the sky while pressing the heels toward the down dog.
- Press the chest toward the thighs and keep the shoulders away from the ears.
- Relax the neck and gaze straight down.
- Bend the legs as much as you need to.
Kneeling Lunge
- Step forward to kneeling lunge (typically the same lead leg that you started with).
- If your foot does not land in alignment under the knee, it’s O.K. to wiggle it or move it with your hand to put it there.
Forward Fold
- Step the back foot to meet the front foot in forward fold position.
- Soften the knees as much as you need so that the low belly rests on the thighs; lift the tailbone.
- Optional half lift – place the hands on the floor, shins or thighs and extend through the crown of the head.
Reverse Circle
- Bend the knees and sweep the hands out to the sides with a long lever.
- Reach toward the sun with an open chest, while slightly bending the knees.
Chair
- With feet hip-width or closer, lower the hips with weight in the heels and the belly braced.
- Place the hands on the thighs for support or in prayer pose, or reach forward.
Return to mountain pose
As you become more comfortable and begin to develop strength, challenge yourself to try other variations of sun salutation. In general, focus on moving with your breath and maintaining a strong, stable core. This will assist with keeping the spine aligned and reducing your chances of injury. You may also find that bending your knees can be helpful in a variety of poses to reduce low-back pressure and maintain alignment of hips and knees.
Overall, yoga is about listening to the body and letting go of expectations or judgment. You may carry competitive egos that push you to do a pose a certain way, but perhaps the best option is the variation that feels best for your body in the moment. It’s always acceptable to omit or modify any pose that may cause pain or just doesn’t fit your body. Child’s pose can be a great choice any time you want to take a mental or physical break during class. Above all, listen to your body and know that yoga is a continual process that evolves every time you practice.


 by
by