Staying Within Your Scope of Practice
It is not appropriate, or your job, for a fitness professional to diagnose a rotator cuff injury. That is the responsibility of licensed medical professionals who are trained in the assessment and diagnosis of such conditions. However, because many of your clients will come to you with this diagnosis, it is your responsibility (and well within your scope of practice) to understand what rotator cuff injuries are, what causes them and what you can do to address your clients' underlying musculoskeletal problems to help alleviate their painful symptoms (American Council on Exercise, 2010).
What Is a Rotator Cuff Injury?
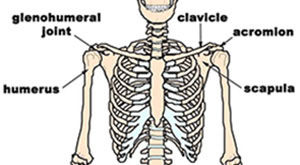
The shoulder is a highly mobile structure made up of several joints and muscles. One of the main joints is formed where the collarbone (clavicle) and the top edge of the shoulder blade (acromion) come together. Another main joint, the glenohumeral joint, is formed where the end of the upper arm (humerus) comes together with the outer edge of the shoulder blade (scapula) (Figure 1) (Gray, 1995).
Figure 1: Bones of the Shoulder
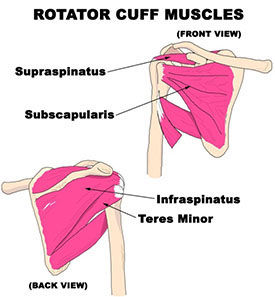
The glenohumeral joint is a ball-and-socket joint that allows for great range of motion, in part due to the smooth cartilage that lines it. While there are many muscles that attach to the arm (including the deltoids, pectorals, biceps and latissimus dorsi), the four rotator cuff muscles (supraspinatus, subscapularis, teres minor and infraspinatus) are primarily responsible for making sure the end of the arm moves and rotates easily in the glenohumeral joint (Figure 2). Because of their attachments, the rotator cuff muscles are intricately involved in nearly every movement of the shoulder and arm. For the same reason, they are also vulnerable to injury from musculoskeletal imbalances, overuse, lifestyle habits and/or accidents.
Figure 2: The Rotator Cuff Muscles (Front and Back View)
What Can Cause a Rotator Cuff Injury?
Each of the rotator cuff muscles originate from the shoulder blade and attaches to various parts of the upper arm. For the rotator cuff to work correctly, the shoulder blade needs to remain fairly stable and act as an anchor for these muscles during movements involving the arm. Conversely, the arm must have the ability to rotate freely in the glenohumeral joint so that when the arm is moving, the shoulder blade does not have to compensate and lose its steady position on the rib cage (Cook, 2010). Ideally, this relationship of stability and mobility limits the likelihood that rotator cuff muscles will become injured and/or strained during movements of the shoulder and arm.
Unfortunately, there are many environmental conditions and musculoskeletal compensations that can affect the stability of the shoulder blade and mobility of the arm in the glenohumeral joint (Price and Bratcher, 2010). For example, focusing on a computer or television screen requires you to constantly adjust your eyes. This typically results in your head jutting forward of its optimal position to read text and watch or look at the images in front of you. This forward head position pulls the shoulder blades up and forward of their optimal position on the rib cage via the upper fibers of the trapezius muscle (which originate on the top of the shoulder blade and attach to the head).
The prolonged seated postures that normally accompany computer use or TV watching also affect the position of the shoulder blades. They move outward and away from the spine when the spine and rib cage drop forward during these activities (Kendall, McCreary and Provance, 1993). Habitual movements of the upper back, head and neck to one side of the spine can also affect the position of each shoulder blade. Routinely carrying a bag or purse on one side of your body, cocking your head to one side to talk on the phone, handedness or musculoskeletal compensations for an imbalance elsewhere in the body can all pull the shoulder blade(s) out of alignment via the muscles that run from the shoulder blade to the thoracic spine, head and neck (e.g., rhomboids, trapezius, levator scapulae).
Stress can also affect the stability of the shoulder blades. When a person is experiencing high levels of stress, innate self-protection measures kick in. This initiates a dropping down of the rib cage at the front to protect our organs from real or perceived threats. This dropping of the rib cage has many effects on the position of the shoulder blades. The rib cage attaches to the thoracic spine, which means that the down and forward movement of the rib cage causes the thoracic spine to round forward and move the shoulder blades out of alignment. The clavicle (which helps create the joint at the top of the shoulder with the acromion) is also involved in the formation of the sternocalvicular joint where it attaches to the rib cage/strenum. As such, when the rib cage drops down and forward, it pulls both the clavicle and the top of the shoulder out of alignment.
While instability of the shoulder blades can be a major contributor to rotator cuff injuries, immobility of the arm in the glenohumeral joint is another factor that can lead to rotator cuff pain and dysfunction. In today’s society we are constantly using our hands for fine motor control skills to engage in activities like typing, texting, needlework, crafts or playing musical instruments. Exercising with equipment that requires us to grip handles is also a constant demand on the muscles and fascia that control our hands and wrists. These tissues of the lower arms are interconnected with the muscles and fascia of the upper arms and shoulders. Over time, restrictions in the tissues and muscles of the hands, wrists and forearms can affect the function of the structures in the upper arms and shoulders and limit mobility in the glenohumeral joint (Myers, 2001).
What Can a Fitness Professional Do to Help?
The key to helping clients overcome rotator cuff injuries is to implement corrective exercise strategies that promote stabilization of the shoulder blades and mobilization of the arm in the glenohumeral joint. Part of this strategy is to correctly align the thoracic spine, rib cage, neck and head so the bones and muscles that interact with the shoulder blades are in their proper position. Once the shoulder blades are stable, progressive strategies can be implemented to help mobilize the glenohumeral joint. This two-pronged approach encourages healing of rotator cuff injuries and reduces the likelihood that they will occur in the first place.
What Corrective Exercise Strategies Should Be Implemented?
Strengthening exercises can be used to help stabilize the shoulder blades and stretching exercises can be used to help mobilize the arms. However, before introducing any of these types of exercises into a client’s program, your clients should perform the self-myofascial release techniques outlined below to ensure myofascial restrictions do not limit potential muscle activation and/or muscle elasticity (Rolf, 1989).
Corrective Exercise Strategies for the Head and Neck
Self-massage Technique - Thera Cane on the Neck
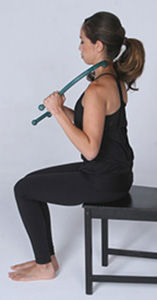 A forward head position pulls the shoulder blades up and forward via the trapezius muscles. Similarly, a head and neck position left or right of center can affect the position of the shoulder blade on one side. A Thera Cane (which can be purchased online for $30 to $40) is a great self-massage tool that can be used to release the muscles of the neck and shoulders to help the scapula settle back into its correct position on the rib cage.
Instruct your client to use the knob on the hook end of the Thera Cane to apply gentle pressure to any sore spots they find on the back and side of their neck and top of their shoulders. Coach them to use the hand on the bottom handle of the device to push down and out to control the pressure of the massage. Perform for two to three minutes each day on each side.
Stretching Exercise - Neck Side Stretch
Once the neck and shoulder tissues have been loosened up, your client can stretch the muscles on the sides of the neck. This will help align the head and neck to center and allow the shoulder blade(s) to drop back into proper alignment.
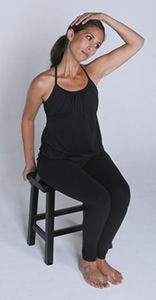
Instruct your client to sit in a chair and grasp the underside of the seat behind the right buttocks with the right hand. Coach your client to pull his or her right shoulder blade back and down while using the left hand to pull the left ear toward the left shoulder. Perform this stretch on both sides for 10 to 20 seconds daily. Have your client evaluate which side is tighter and encourage him or her to stretch the tighter side two to three times more often.
Corrective Exercise Strategies for the Thoracic Spine
Self-massage Technique - Tennis Ball(s) Beside the Spine and Around the Shoulder Blade
When the thoracic spine has a sideways bend in it due to scoliosis or is excessively rounded forward (i.e., excessive thoracic kyphosis), the muscles that lie beside the spine (i.e., thoracic erector spinae) and the muscles that go from the spine to the shoulder blades (i.e., rhomboids and trapezius) can become tight or restricted and affect the position of the shoulder blade(s). Using a tennis ball to massage these muscles will help allow the shoulder blades to fall back into proper alignment.
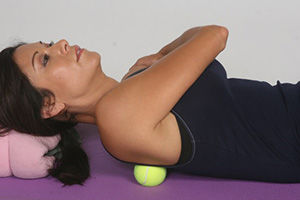
Instruct your client to lie on the floor with knees bent and head supported by a pillow. Coach your client to use a tennis ball to apply pressure to any sore spots he or she finds on either side of the spine and out to the inner edge of the shoulder blade. As the client moves out toward the shoulder blade, have him or her to hug the opposite shoulder to increase the pressure. Perform for 15 to 20 seconds on each sore spot on both sides of the upper back at least once a day.
Strengthening Exercise - Lying Shoulder Retraction
Once the muscles of the upper back have been loosened, your client can perform an isolated strengthening exercise to help stabilize the shoulder blades and place the heads of the upper arm into their correct position. This exercise is ideal for helping clients learn how to pull the head back, and retract/depress the scapula correctly, before progressing to more challenging strengthening exercises using resistance bands and/or weights.
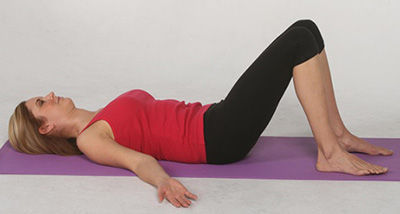
Instruct your client to lie on the floor with knees bent and hands out to the side with palms up. Coach your client to lengthen the back of the neck by tucking the chin in and pulling the head back to the floor. If your client cannot make contact with the floor without tipping the head back, place a pillow under his or her head. With neck lengthened, instruct your client to retract and depress the shoulder blades. As your client becomes proficient at this movement, progress the exercise by instructing him or her to turn the palms downward (without letting go of the muscles that are retracting and depressing the scapula). Perform three to five times per day, holding each repetition for 10 seconds.
Corrective Exercise Strategies for the Arms and Hands
Self-massage Technique #1 - Forearm Massage
The forearm muscles control movements of the hand and wrist. They are inherently linked to the muscles of the upper arm and shoulder through myofascial connections. Therefore, it is important to keep these muscles healthy so the upper arm can move freely in the glenohumeral joint.
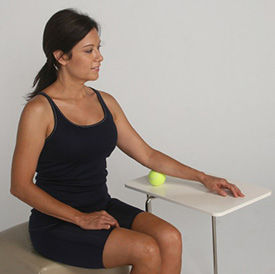
Instruct your client to use a tennis ball, baseball or lacrosse ball to massage the muscles on both sides of the forearms while they sit with the arm propped on a table or desk. Perform at least once a day for one to two minutes on each arm.
Self-massage Technique #2 - Front of Shoulder and Arm
The biceps muscles originate on the front of the shoulder blade. When these muscles become tight due to overuse from exercise and/or extended periods of computer work, they can restrict movement of the arm in the glenohumeral joint and pull the shoulder blade out of alignment. 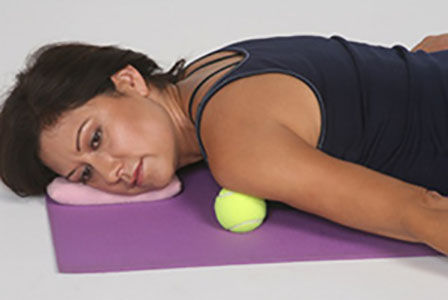
Instruct your client to lie face down on the floor and use a tennis ball, baseball or lacrosse ball to massage the front of the shoulder and biceps. Perform once a day on each side for 10 to 15 seconds on all sore spots.
Stretching Exercise #1 - Biceps Stretch
This stretch should be done immediately following the massage techniques detailed above. It will improve flexibility of the biceps, promote mobility of the glenohumeral joint and allow the scapula to sit back and down correctly on the rib cage.
Instruct your client to stand facing away from a high countertop or piece of gym equipment. Coach your client to lift the right arm behind the body, with the thumb pointed downward. Have your client pull the right shoulder blade back and down while still keeping the right arm rotated to maintain the thumb-down position. Instruct your client to gently rotate the body away from the right arm, while keeping the right shoulder blade back and down. Encourage your client to perform this stretch on both sides for 15 to 20 seconds at least once a day.
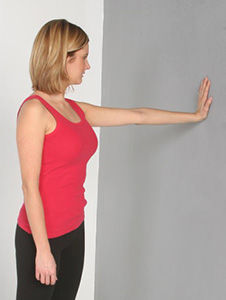
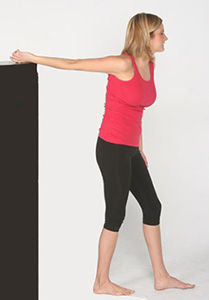
Stretching Exercise #2 - Palm on Wall Stretch
This stretch should be done once your client has massaged the muscles of the forearms, shoulders and neck (see above). This is a great flexibility exercise that will promote mobility of the arm from the hand all the way up to the glenohumeral joint.
Instruct your client to stand facing a wall and extend the left arm at shoulder level with the palm flat on the wall and the arm straight. Coach your client to pull the left shoulder blade back and down and gently turn the right shoulder away from the wall, while still maintaining the stabilized shoulder blade position on the left side. Progress this exercise by teaching your client to gently rotate the left arm forward without bending the arm or moving the palm on the wall. The rotation of the arm should happen at the shoulder, elbow and wrist, not by sliding the palm forward. Perform for 10 to 20 seconds on both sides at least once a day.
Conclusion
A rotator cuff injury not only affects one’s ability to exercise, but can also severely limit most daily activities. While it is not within your scope of practice to determine if a client has a rotator cuff injury, you can use your knowledge of what causes it and how to design exercises that stabilize the scapula and mobilize the arm to help rotator cuff problems heal and/or or reduce the likelihood that this type of injury will occur.
Become a BioMechanics Method® Corrective Exercise Specialist
Want to learn more about how you can help your clients who have low-back pain? The BioMechanics Method® Corrective Exercise Specialist online course (TBMM-CES) is specifically designed to give fitness professionals a step-by-step process for working with clients who experience muscle and joint pain. Created by Justin Price, one of the top musculoskeletal assessment and corrective exercise experts in the world, this course will give you the postural assessment, anatomy, corrective exercise and program design skills necessary to help clients become pain free. This self-paced study course is valued at 8.0 ACE CECs and includes digital textbooks, videos and online quizzes.
References
American Council on Exercise. (2010). ACE Personal Trainer Manual (4th edition). San Diego, Calif.: American Council on Exercise.
Cook, G. (2010). Movement. Aptos, Calif.: On Target Publications.
Gray, H. 1995. Gray’s Anatomy. New York: Barnes & Noble Books.
Kendall, F., McCreary, E. and Provance, P. (1993). Muscles: Testing and Function (4th edition). Philadelphia: Lippincott Williams and Wilkins.
Myers, T. (2001). Anatomy Trains: Myofascial Meridians for Manual and Movement Therapists. Edinburgh: Churchill Livingstone.
Price, J. and Bratcher, M. (2010). The BioMechanics Method Corrective Exercise Educational Program. San Diego: The BioMechanics Press.
Rolf, I.P. (1989). Rolfing: Reestablishing the Natural Alignment and Structural Integration of the Human Body for Vitality and Well-being (revised edition). Rochester, Vt.: Healing Arts Press.
Yamamoto, A. et al. (2010). Prevalence and risk factors of a rotator cuff tear in the general population. Journal of Shoulder and Elbow Surgery, 19, 1, 116-120.
 by
by